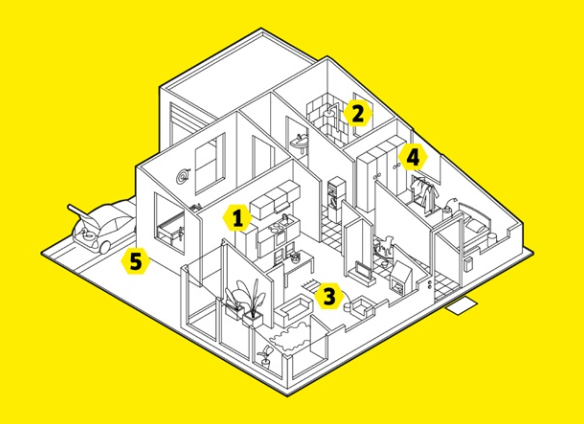
Kärcher tips for keeping the home clean!
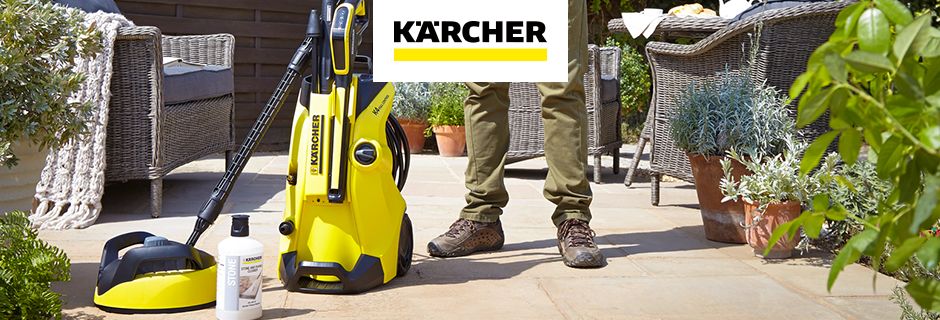 Around the world, people spend around 3 hours 20 minutes cleaning their home every week - according to a study of global cleaning behaviour conducted for Kärcher. Many cleaning devices or household supplies are used for this. Whether indoors or outside, the work is done much quicker with tips for the correct use, meaning you have more time for the good things in life.
Practical tips, tricks and application instructions for cleaning your home
Here you will find a range of tips and examples for getting your home into shape. Whether with a high pressure cleaner or duster - we have all the information about how to clean properly and quickly.
 A cosy evening on the couch with snacks and drinks, children or pets romping around the living room – before you know it, crumbs and stains have found their way onto upholstery and carpets. But not to worry: It takes just a few simple tools to do away with these little mishaps. Using these tips and devices, your living areas and carpets will remain beautiful for years to come.
Why should you clean carpets and upholstered furniture regularly?
Sofas and armchairs are what make living rooms so comfortable and cosy – and therefore experience the highest use. The same goes for beautiful rugs and carpets, which add comfort and accentuate your design but are also very susceptible to stains. To make sure you can enjoy these features for years to come, regular carpet and upholstery cleaning is required. There are several reasons for this:
- More stubborn dirt is loosened
- Unsightly stains disappear
- Pet hair and harmful mites are removed
- Upholstered furniture and carpets continue to look good, their lifetime is extended
The same goes for mattresses and car seats, by the way, which should also be cleaned regularly.
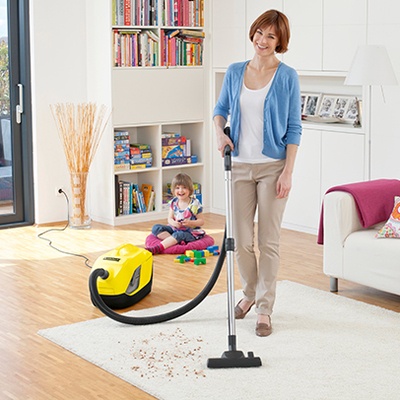
For surface dirt: Vacuuming
Surface dirt on carpets and upholstery, for example loose dirt or crumbs, can be easily removed with a vacuum cleaner. But it's important to choose the right accessories.
Carpet cleaning
Rugs and carpets should be thoroughly vacuumed at least once a week. Vacuum cleaners generally have a switchable floor nozzle to choose between a setting for hard floors and a setting for carpets and rugs. If you have high-pile carpets or rugs, you should use a turbo suction nozzle for thorough cleaning. A cordless electric broom is recommended for quick cleaning in between
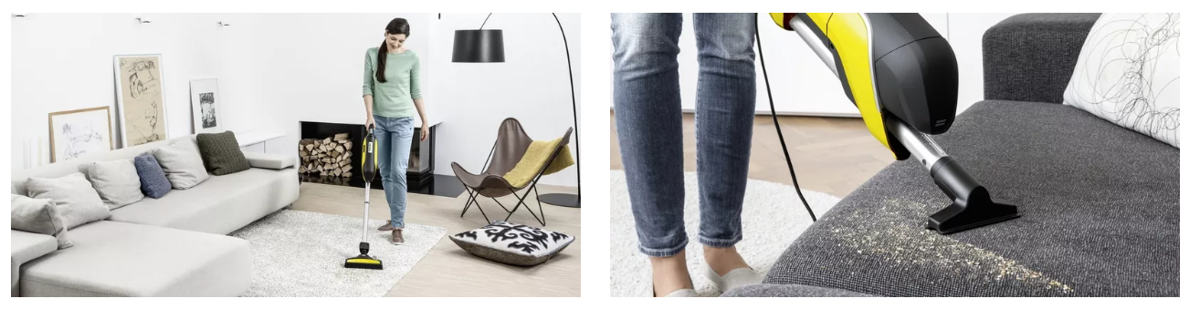
Upholstery cleaning
Vacuum cleaners are also suitable for cleaning the surface of cushions, mattresses or car seats. Use an air-powered turbo upholstery nozzle for particularly thorough cleaning. It reliably removes stubborn dirt, pet hair and even harmful mites, which can accumulate in mattresses but also upholstered furniture.
For allergy sufferers: Vacuum cleaners with water filter
The DS 6 vacuum cleaner with water filter not only ensures crumb-free carpets and upholstery, but also clean and fresh air. It cleans without a filter bag, simply using the natural power of water. In doing so, it filters 99.5% of all particles from the air, binds them in water and thereby ensures a more enjoyable indoor climate. A breath of fresh air for allergy sufferers. An added advantage: Vacuuming also reduces unpleasant odours in the house.
Cleaning tips for the device: Simply hold the individual parts of the water filter under running water after vacuuming – this ensures they're quickly ready for use again.
For stubborn stains: Spray extraction cleaning
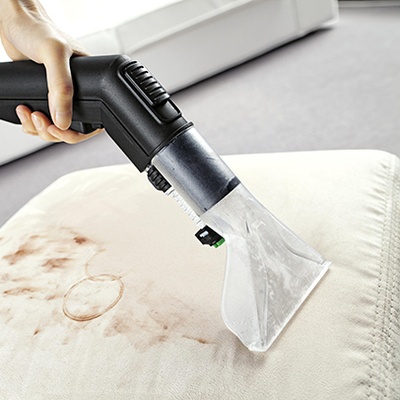
Carpets, rugs, cushions, car seats and mattresses can be cleaned deep into the fibres with a spray extraction cleaner. The principle behind these devices is very simple: Water and detergent are sprayed on with the spray extraction cleaner and then vacuumed out of the fibres again together with the dirt. This method is particularly thorough and the drying time is much shorter compared to dirt removal without a spray extraction cleaner.
Tip: If possible, remove stains while they are wet.
This is how it works:
- First remove coarse dirt from the carpet or upholstery with the vacuum cleaner.
- Fill water into the tank of the spray extraction cleaner and add carpet detergent in line with the dosing instructions.
- Evenly spray on the water and detergent, keeping a distance of 10 cm between the floor nozzle and the carpet or upholstery, and leave the mixture to work for a few minutes.
- Place the floor nozzle on the carpet or upholstery and slowly and evenly suction off the moisture.
- Always wet connected upholstered surfaces or carpets completely with water and detergent to avoid water marks during drying.
- Repeat the process until you can no longer extract any dirt or detergent from the fabric.
- If you need to, rinse once or twice with clear water (temperature depends on material).
- Allow ample time for carpets and upholstery to dry and make sure you ventilate the room well in the meantime.
- Thoroughly vacuum carpets and upholstery again once dry.
- To finish off, apply textile impregnator to the fabric – this will ensure that carpets and upholstery stay beautifully clean for longer.
Tip:
You can also use a spray extraction cleaner to remove detergent residue from textile floor coverings and upholstery – for example if stains have already been treated manually or there is still some detergent in the fibres from the last time they were cleaned.
Caution: You should always check the water resistance of upholstery and carpets, ideally in an inconspicuous spot, before a spray extraction.
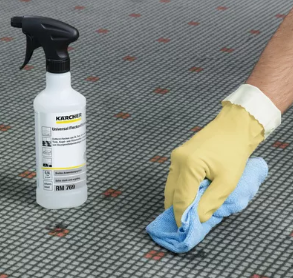
Intermediate cleaning: Spot removal of stains
Stains on carpets or upholstery can be vexing – whether they are caused by chocolate, red wine, grease or dirt from outside. They usually require swift action, after all:
- fresh stains are easier to remove,
- old stains are harder to identify,
- stains can spread if they are left alone for too long.
For wet stains, it is generally important to act quickly and immediately dab the stain with a clean, dry cloth. Never rub at the stain while doing so, otherwise the liquid will get deeper into the fibres and the fabric could be damaged.
90% of all stains are soluble in water. You can quickly test this with a white cloth and lukewarm water. If the water starts to dissolve the stain, you can remove it from the fibre by making slight rotating movements with the cloth from top to bottom.
If the stain is not soluble in water, use a universal stain remover: Spray the stain remover onto a colour-fast cloth and dab the stain until it comes off. You can then rinse the area with a spray extraction cleaner to remove stain remover residue.
Don't worry about beautiful parquet – clean wooden floors quickly and gently
Whether in the living room, bedroom, dining room or hallway, wooden floors are becoming increasingly popular not least due to their appearance. But care is advised when it comes to cleaning: wooden floors are sensitive to water. How should you then proceed without damaging the floor covering? With the right floor cleaner, worrying about beautiful parquet is a thing of the past.
Special characteristics of wooden floors
When it comes to wooden floors, a distinction is made between parquet, floorboards and laminate, with parquet and floorboards consisting solely of wood while laminate is made up of a mixture of materials with fibreboard. Each type of floor covering possesses its own specific properties:
Laminate is usually laid with a wood effect, but is also available with a tile or stone effect. It consists of fibreboard as a base layer, a decorative layer and a clear melamine resin layer on top, referred to as the overlay. The surface is scratch-resistant and easy to clean, but the edges are usually sensitive to moisture – particularly when the laminate has been laid incorrectly.
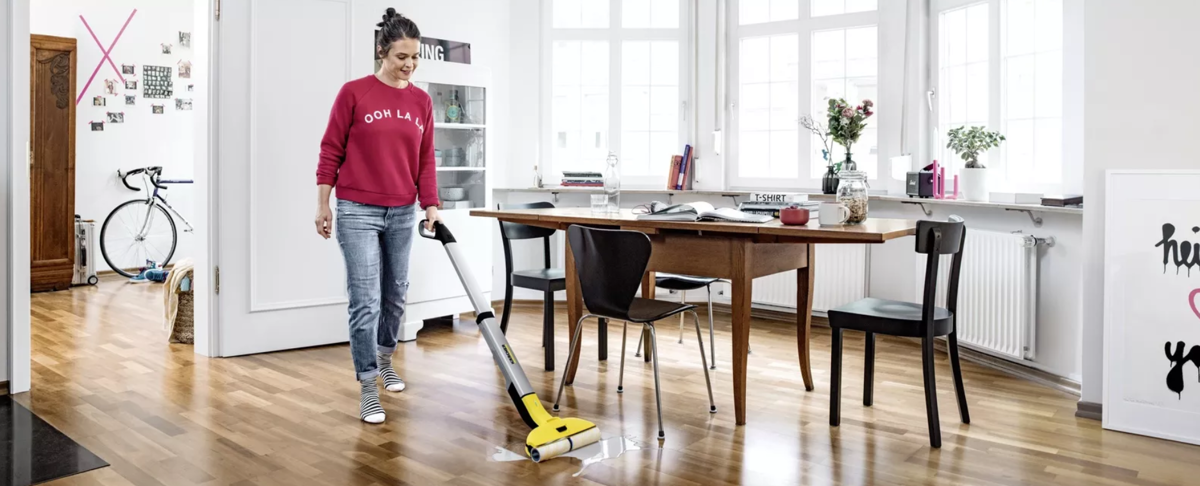
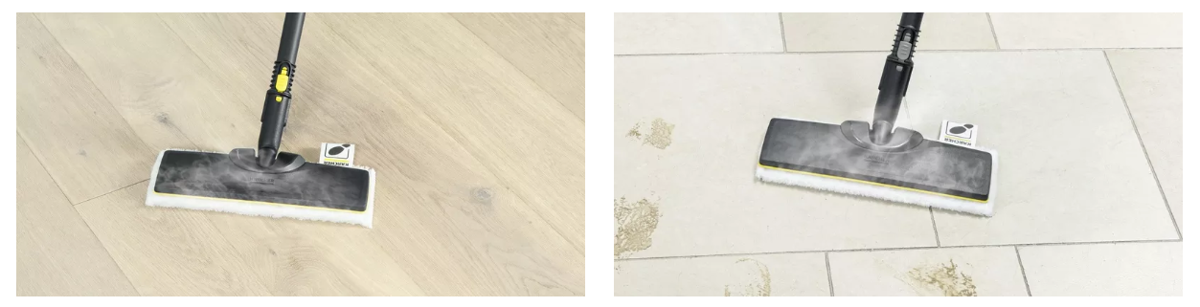
Damp wiping with the FC 3 Cordless and FC 5 floor cleaners
Since wooden floors are sensitive to moisture, it is important to use as little water as possible when cleaning them. The FC 3 Cordless and FC 5 floor cleaners are ideal for gentle, damp wiping as they leave behind minimal residual moisture, which dries fully in just a few minutes.
FC 3 Cordless
- Electronic wiping system
- Battery-powered for cleaning a floor area up to 60 m²
- One-tank system: fresh water tank for continuously wetting the microfibre rollers with fresh water
- Dirty water is scraped off the rollers and collected in a tank
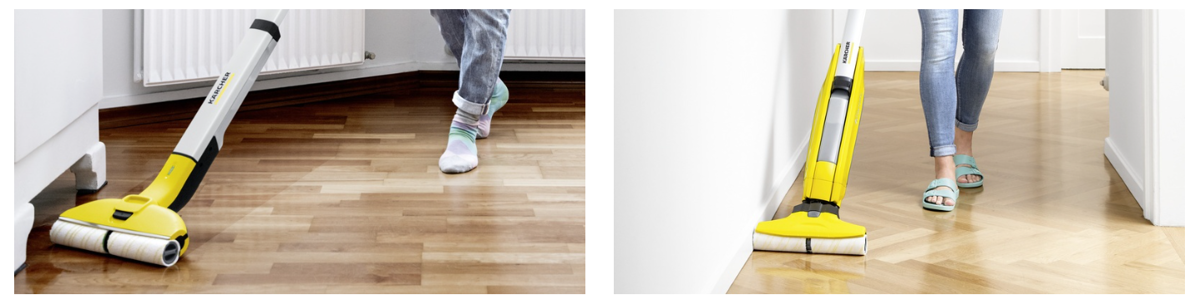
- The slimline design makes it possible to clean edges and corners effortlessly, as well as under pieces of furniture
- Up to 90 percent water saving compared to wiping using a mop
FC 5 and FC 5 Cordless
- 2-in-1 cleaning system: wipes and vacuums up the dirty water at the same time
- Either with a cord or battery-powered without a cord
- Two-tank system: the FC 5 has one fresh water tank and one dirty water tank
- Two rotating microfibre rollers
- Roller self-cleaning function in the parking station
- The position of the rollers makes it possible to wipe right up to the edge
- Up to 90 percent water saving compared to wiping using a mop
Important note
Before cleaning with the FC 3 Cordless, loose coarse and fine dirt should be removed from the floor using a vacuum cleaner. Although the FC 5 features a suction function and can suck up small particles, it is not a replacement for cleaning using a vacuum cleaner.
 1. Before wiping, remove dust and coarse dirt from wooden floors using a vacuum cleaner, cordless electric broom or conventional broom.
2. Remove the water tank on the FC 3/FC 5 and fill it up to the mark. Add detergent according to the dosing instructions.
3. Fit washed rollers to the FC 3/FC 5, paying attention to the colour coding on the device and rollers (blue to blue, green to green).
4. Switch on the device and start cleaning, moving the machine forwards and backwards slowly in lines. Note: For the FC 5, wet the rollers in the station before use.

5. After cleaning, remove the waste water container from the device, empty it fully and rinse it out with fresh water.
6. Remove the microfibre rollers, wash them at 60 °C in a washing machine without fabric softener and then leave to dry.
7. Recharge battery-powered devices fully after use – until the LED display is continuously lit up.
8. Set the device down conveniently at the parking station until the next time you need to use it, attach the rollers to the device.
Additional tips for cleaning
-
To prevent overfilling the dirty water tank, it is recommended that you only half-fill the fresh water tank on the FC 5.
-
Do not spend too long cleaning one area so that the floor does not get too wet.
-
In the case of oiled or waxed wooden floors, you should also avoid spending too long on one area as doing so could remove the oil or wax from the wood.
-
Delicate floors, such as untreated cork floors, should be tested for water resistance in an inconspicuous area.
It all comes down to the detergent
To ensure that the wooden floor is not just clean, but also well maintained, a detergent which contains a maintenance component in addition to the cleaning component should be used for cleaning. The right equipment for a specific wooden floor depends on how the surface of the wooden floor has been treated:
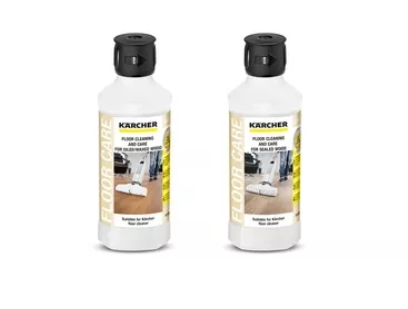
- Sealed wooden floors: The RM 534 cleaner is ideal for thorough and gentle cleaning, refreshing and care of sealed wooden floors (parquet, cork and laminate). Thanks to its moisture protection, the floor is also protected against swelling.
- Oiled/waxed wooden floors: The RM 535 cleaner, with a special maintenance component that leaves behind a streak-free, semi-matt gloss and also protects the floor against moisture, is perfect for cleaning and care of oiled or waxed wooden floors.
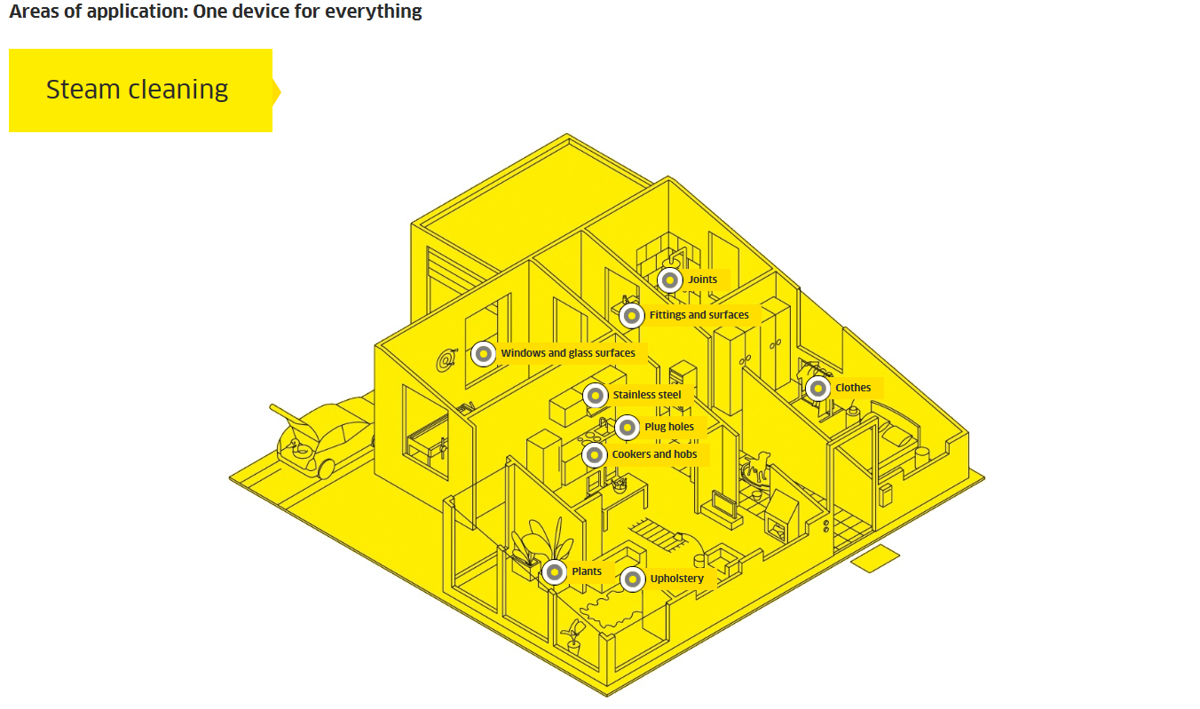
Steam cleaning: Hygienic cleanliness without chemicals
Steam cleaners remove even stubborn dirt quickly and easily – and without any chemicals at all. They ensure cleanliness throughout the home in the most natural way, making them a real alternative to conventional methods of cleaning. Whether in the bathroom, the kitchen or the living room, they can be put to a wide variety of uses. What could be more natural than using the power of steam for big and small cleaning jobs around the house?

Cleaning with steam works so well because...
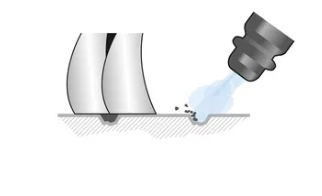
The secret behind steam cleaning lies in combining a jet of steam with a high temperature. A steam cleaner basically functions like a pressure cooker: Water is heated in the steam cleaner's self-contained tank until it comes to the boil and produces steam. This steam is then released by the steam gun in measured quantities. The higher the steam pressure, the faster the steam is released – and consequently the better its cleaning power. Stubborn and greasy dirt is dissolved and removed in a matter of seconds. Even hard-to-reach areas can be cleaned much more easily, resulting in a deeper clean – all without using any chemicals.
Another advantage is that the generation of steam demineralises the water, so the steam does not leave any lime residue or streaks behind.
Seven good reasons for cleaning with steam:
-
Cleaning with steam is environmentally friendly – no detergents, low water consumption
-
Cleaning with steam is hygienic – also in difficult to reach areas
-
Cleaning with steam is easy – no scrubbing or polishing
-
Cleaning with steam is healthier – no detergents
-
Cleaning with steam is versatile – it can be used for cleaning kitchens, bathrooms or windows, as well as for ironing and fabric care
-
Cleaning with steam saves time – speeds up cleaning
-
Cleaning with steam is economical – since detergent is not required
Ideal for children and allergy sufferers

Unlike cleaning solutions, steam condensate does not leave any potentially allergenic residues behind on the cleaned surface, which makes cleaning with steam ideal for sensitive individuals in particular. Moreover, steam cleaners remove 99.99% of all common household bacteria on hard surfaces. This is particularly important for small children, who like to put items in their mouth. Accidents as a result of using the wrong detergent, skin irritations and other health hazards caused by cleaning substances are no longer an issue with steam either.
Allergy sufferers can breathe a sigh of relief too: Steam binds dirt to prevent allergens (like house dust mites and mite excrement) from being dispersed, which noticeably improves the air in the room as well. And last but not least, cleaning with steam requires considerably less effort.
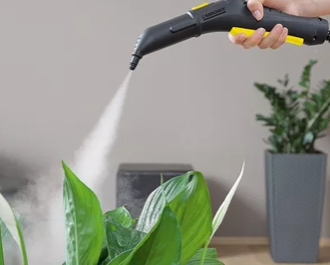
Large indoor plants are often covered in a thin layer of dust. Using a duster to remove it is often very arduous. Using a steam cleaner, on the other hand, makes it easy: Steam the plants from 20 to 30 centimetres away and then use a cloth to remove the dust. Tip: Cover moisture-sensitive floor coverings first.
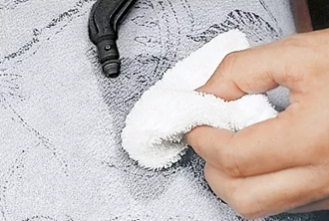
Steam cleaners can be a great help for cleaning upholstery as well: To remove individual stains, simply position the detail nozzle at an angle (not vertically) against the upholstery and hold the microfibre cloth next to it, then release the steam. The steam jet "blasts" the stain into the microfibre cloth so to speak. Tip: Check the fabric's sensitivity to heat on an inconspicuous area beforehand.
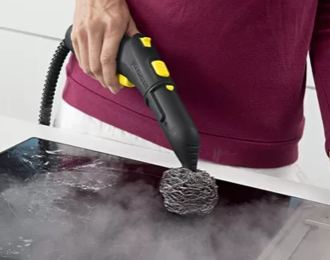
Steam makes removing stubborn, encrusted stains on your cooker and hob easy. To clean ceramic hobs, use a round brush with a commercially available stainless steel scouring pad placed over the brush head. You can find these in the household supplies aisle. Now clean the entire hob by steaming the area continuously. Don't worry: The steam forms a lubricating layer of air under the scouring pad to prevent scratches. Joints and edges can be cleaned without the scouring pad using the detail nozzle and a round brush (which is attached to the detail nozzle). Make sure you use a brush with plastic bristles as these will not scratch on the hob. Then dry the surface with a folded cloth. Tip: Even ovens and grill racks can be cleaned easily this way.
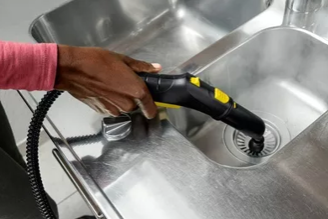
Regular steam cleaning is recommended for removing deposits and odours found in basin plug holes: Hold the detail nozzle against the plughole and release steam – the narrow and powerful steam jet will simply wash the dirt away. Tip: Do not steam the plastic parts underneath the sink strainer directly as these can be damaged by excessively high temperatures.
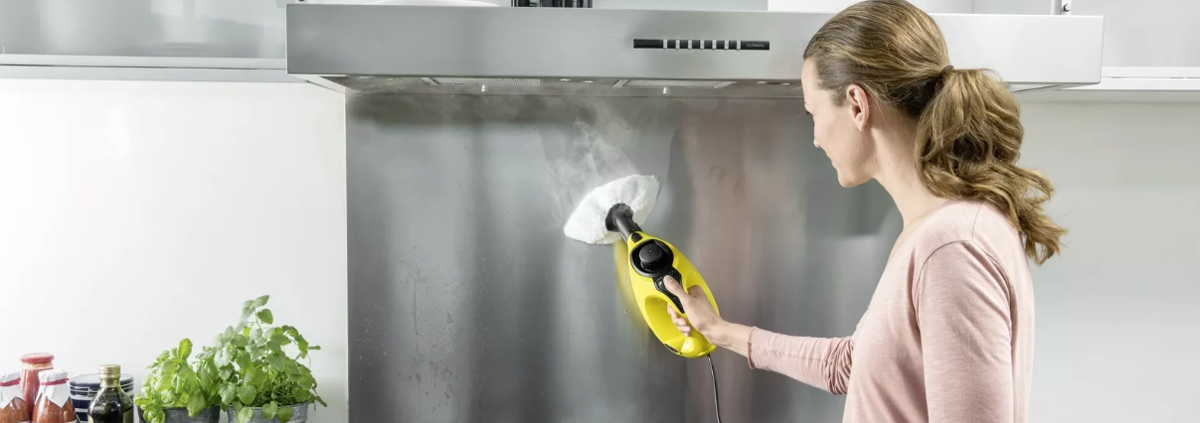
Stainless steel is on trend – but not with a greasy film. Make time-consuming cleaning a thing of the past with the steam cleaner and matching accessories (soft cover and microfibre cloth): Place the microfibre cover over the hand nozzle. Then release steam and rub the stainless steel surface with the microfibre cover until the oil and fat deposits start to disappear. If the greasy film is old, constant rubbing and pressure alone will not get rid of it – always apply steam. In the case of grained stainless steel, make sure to follow the grain when cleaning. The grease will gradually accumulate in the cloth, meaning it should be changed midway through cleaning. For a streak-free finish the cleaned area can be polished with a microfiber cloth afterwards.
Freshening up clothes couldn't be easier with the textile care nozzle. The integrated lint remover helps to remove hair and lint from clothing. You can also use steam to smooth out creases easily on curtains and clothes without having to take out the ironing board. An added advantage of steam is that it also removes odours reliably. Take care not to make clothes too wet when steaming and always maintain a safe distance.
Tip: Always test the item's steam tolerance on an inconspicuous area before treating it with steam. Firstly steam it, then let it dry and then check the garment for changes in shape or colour.
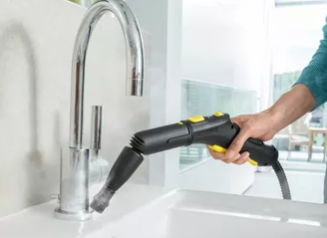
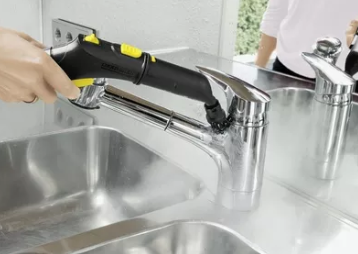
When cleaning with steam, always use the detail nozzle to avoid scratching chrome and stainless steel fittings. Follow these steps: Hold the detail nozzle very close to the object to be cleaned until the limescale has dissolved. If this fails to remove the stubborn limescale or it is in an awkward spot, you can attach a brush to the nozzle: Rub the spot with powerful jets of steam. Even the most stubborn dirt can be removed with direct steaming and vigorous scrubbing. Pre-treating thicker patches of limescale with vinegar, lemon juice or a cleaning product for sanitary facilities (sprinkling it on and leaving it to work) is recommended. What's more, regular steaming prevents the build-up of limescale deposits.
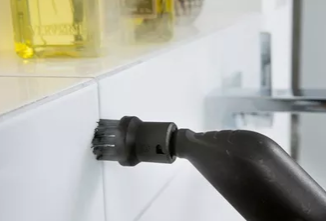
Enjoy clean joints again with a steam cleaner and matching accessories: The ability to attach a small round brush to the detail nozzle makes it ideal for targeted cleaning. Even the most stubborn dirt can be removed with direct steaming and vigorous scrubbing. Once you have steam cleaned the area, simply rub it dry using a cloth to prevent dirt from settling in the joints again. Always steam silicone joints for a short amount of time only to protect the material.
Floor cleaning with steam
Cleaning laminate and parquet floors
- Remove any dust on the laminate or parquet floor with a vacuum cleaner
- Limit the steam flow to the lowest setting
- Release the steam and move the floor nozzle quickly from side to side
- Do not release steam continuously and only use the amount needed to remove any dirt
- Make sure not to create any puddles
- The residual moisture will dry without leaving streaks behind
Cleaning ceramic and fine stoneware tiles
- Attach a cloth to the floor nozzle to clean tiled floors
- Using microfibre covers for fine stone is recommended as the fine fibres are ideal for getting into the microporous structure
- Move the floor nozzle from side to side quickly in overlapping strips when steam is released
- Only use the amount of steam needed to remove any dirt
- To clean the joints, move the floor nozzle up and down and from side to side (in the shape of a cross)
- Make sure to change the dirty cloths as needed
Good to know
Add warm water to the water tank to reduce your device's heat-up time. Rinse the water tank with fresh water after every third use to remove any limescale deposits.
Steps for descaling: Mix water with descaling powder to create a solution. Please observe the dosing information on the packaging when doing so. Pour the solution into the water tank and leave it to work for at least eight hours, or preferably over night. Then fully drain the descaling solution and rinse the tank with cold water two to three times to remove all residues.
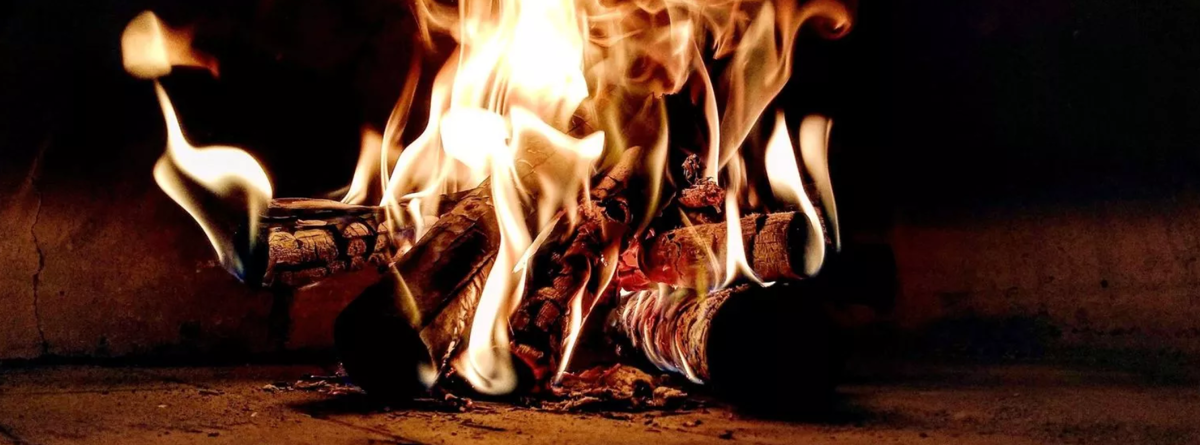
How do you clean a fireplace?
Anyone who has a fireplace can look forward to cosy hours around the fire in winter. To be able to enjoy the pleasant warmth and the flickering flames, certain points should be noted.
Before starting the fire: Make sure the firewood is sufficiently dry

Firewood that is bought not ready for use must be stored and dried out before it is put on the fire. If the wood is too damp, the combustion value decreases and smoke and soot are generated: The fireplace and its surroundings then get dirty more quickly. The maximum moisture content for wood to be burned in a fireplace is even stipulated by law. It should not be more than 25 per cent.
In order to check, a measurement instrument or - with a little experience - a fingernail test is required. If the cut surface where the annual growth rings are visible can be easily pressed in with a fingernail, the wood should be dried for a few more months. It should optimally be stored in a place protected from the weather and with a good air supply, such as a shed.
After the fire: Remove the ash with a vacuum cleaner
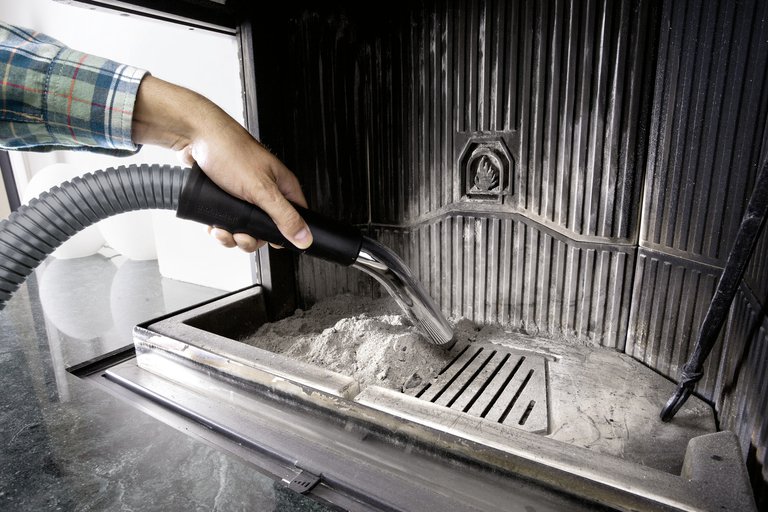
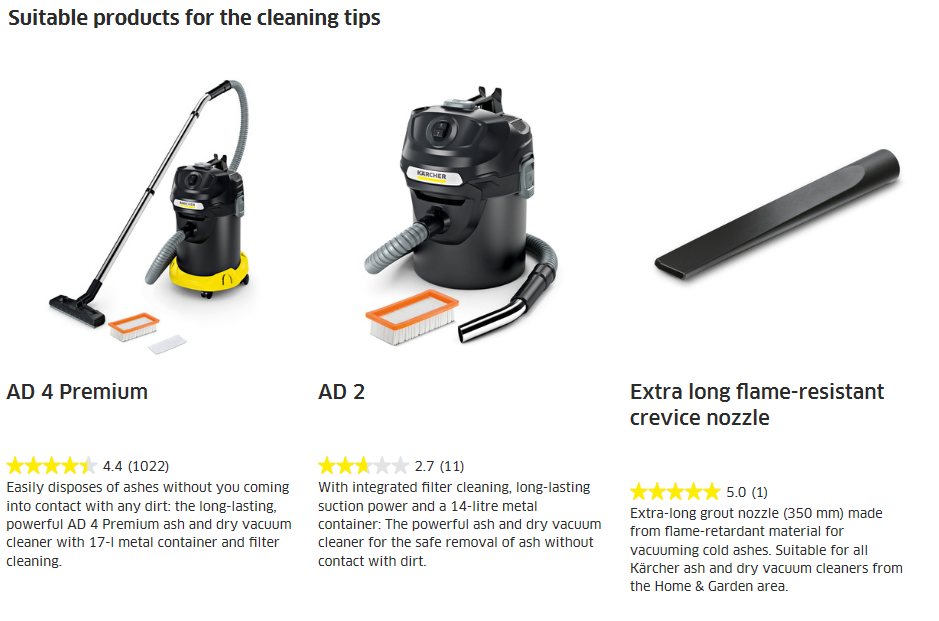
After a cosy evening around the fireplace, the ash must be disposed of. Cleaning the fireplace with a broom and a dustpan is quite a messy affair. Alternatives are ash vacuum cleaners such as the AD 4 Premium, with which many types of ovens can be safely and conveniently cleaned – whether tiled stoves, Swedish ovens or pellet stoves. .
Procedure:
-
Before cleaning, the ashes must be cooled to below 40° Celsius.
-
Vacuum the ashes out of the fireplace.
-
If the suction power decreases, actuate the filter cleaning. With the push of a button, the air flow is reversed, the dirt is blown out of the filter into the container, thus again increasing the suction power.
-
To empty, first remove the cassette with the flat pleated and coarse dirt filter and beat. Then empty the container.
What's more: The scope of supply of the device also includes two suction tubes and a floor nozzle. So you've also got a fully-fledged dry vacuum cleaner for cleaning hard floors – which is practical, for example, for use for thorough cleaning around the fireplace or in the hobby room.
Clean windows: the ultimate house cleaning achievement
Large windows, and large numbers of them, flood a home with light and make it feel inviting. Rain, pollen and fine dust, however, quickly make them dirty and dull the view. On the inside, windows also have a lot to contend with; children and pets in particular often leave behind prints and blotches on the window pane. These tips will help you clean your windows without leaving behind any streaks.

Preparation is everything
In order for the window panes to remain sparkling clean, several factors need to be considered.
- Windows should never be cleaned in direct sunlight. If you do this, the cleaning agent solution dries on the window pane too quickly and leaves behind unsightly streaks.
- If too much cleaning agent is used in the solution, a greasy film can form on the window. Therefore, always use cleaning agent or glass cleaner sparingly.
When cleaning the windows, don't forget the frames. After all, they are exposed to the elements just like the window panes.
1. Remove coarse dirt with a hand brush or a dry cloth.
2. Then thoroughly clean with a wet cloth or a soft sponge.
3. When selecting a detergent, consider the material the frame is made of:
-
For wood, there are care agents which protect it from weathering.
- Plastic frames can be cleaned with anti-static cleaners which are specifically designed for plastic.
The traditional way
- Thoroughly wash the window down with a sponge or a lint-free cloth and lukewarm water with a little detergent.
- Wipe down the liquid in figure-of-eight movements from the top to the bottom and mop it up with a cloth.
- Using a chamois leather, microfibre cloth or tea towel, polish the window pane and remove the last few drops of water.
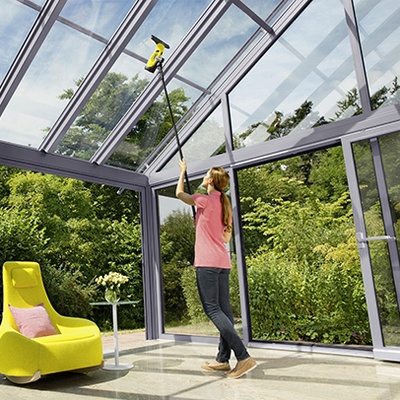
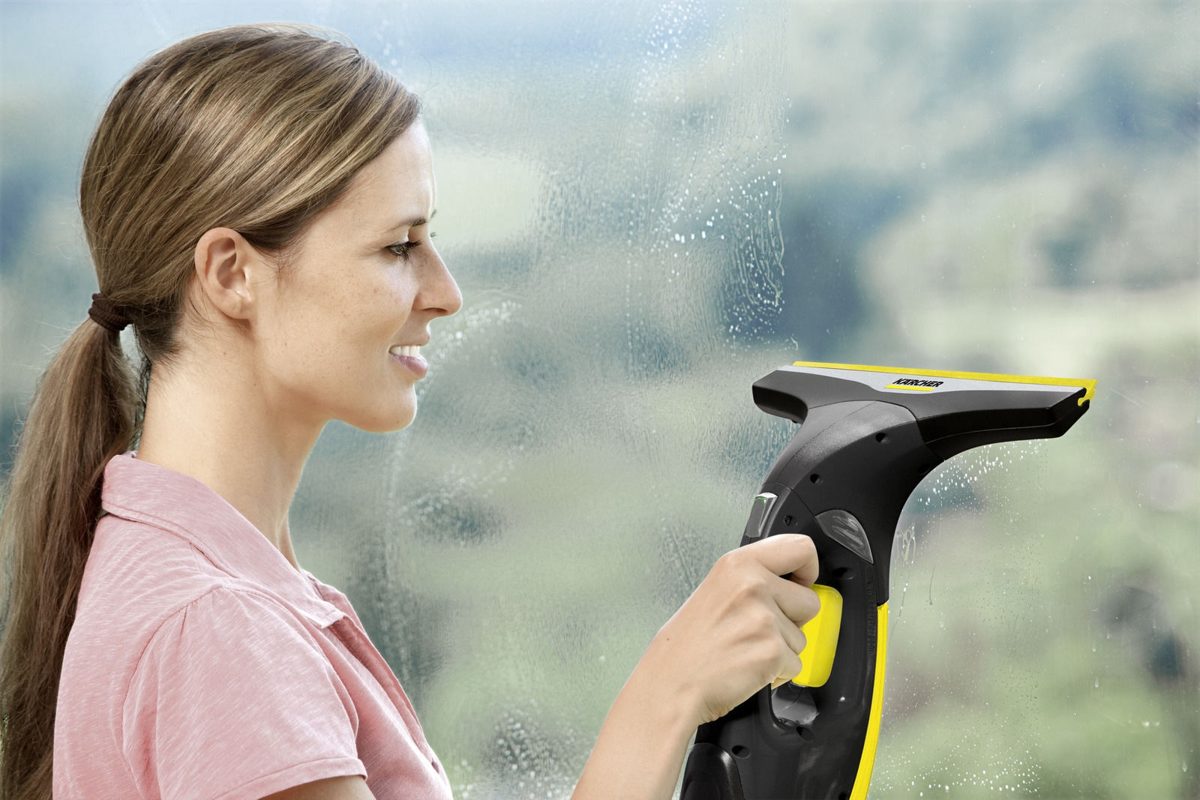
Achieving the perfect shine with technology
- Spray on the detergent with the spray bottle.
- Loosen coarse dirt with the integrated microfibre cloth.
- Vacuum up the moisture using the window vac. This device is also suitable for high windows. With a telescopic lance, it is possible to make even hard-to-reach window panes shine like new.
The complete package: curtains and blinds
Anyone who wants to give their windows a thorough clean not only cleans the frames and window panes, but also gives the curtains a good wash and dusts the inside of the blinds.
- After spin-drying the curtains, hang them straight back on the rail – this means you will not have to iron them, depending on the material.
- Remove all dust from the blinds with a damp cloth. Cleaning them with a silicone dough scraper wrapped in a microfibre cloth is also highly effective.
- A practical alternative for achieving clean blinds is using a steam cleaner, such as the SC 3 from Kärcher.
Other glass surfaces around the house
If you're at it already, the window vac might as well help take care of any other glass surfaces. Here too it proves to be a loyal cleaning assistant:
-
Car windows
-
Shower cabins
-
Wall tiles
-
Mirrors
-
Glass tables
-
Glass doors
-
Display cabinets
A care package for the floor
From elegant parquet to robust tiles or practical linoleum – there's a floor to meet every living requirement. But how can we make these different floor coverings stay beautiful forever? We supply tips for your home.

The hard life of a hard floor
One of the surfaces most subject to wear in the home is the floor. It has to put up with a great deal on a daily basis. Pet paws, biscuit crumbs, coffee stains and muddy shoes – over time, all of this takes quite a toll on the floor beneath our feet. Although there are now a few very forgiving hard-wearing hard floors available, even these deserve to be regularly indulged with an extensive care package. After all, only a floor that is clean and looked after makes your home feel inviting and comfortable. Most importantly, you need to respond to the different requirements of each type of flooring. Not all floors are the same, especially when it comes to cleaning.

Parquet
Elegant wooden hard floor.
Real wood is vulnerable to scratches. Before cleaning and polishing, always remove the coarse dirt first.
Suitable for cleaning with a broom, vacuum cleaner and damp wiping.
Laminate
Extremely durable flooring.
Synthetic resin with decorative paper layer. Available in many different colours and styles.
Suitable for cleaning with a vacuum cleaner and damp wiping but too much moisture could cause it to swell.
Linoleum
Elastic floor type.
Popular in living areas and children's rooms. Generally considered to feel warm underfoot, absorb the sound of footsteps and be easy to maintain.
Not suitable for use with too much moisture. Vacuum cleaning and damp wiping are the best choice.
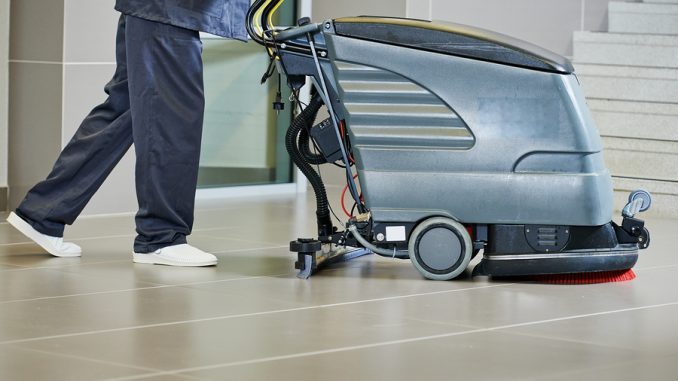
Tiles
Especially resilient and therefore popular in kitchens and bathrooms.
Highly compatible with moisture – and therefore easy to clean.
Grout joints have special requirements: acidic cleaning agents, such as vinegar-based cleaner, could corrode them.
Strategies for clean floors
Sucks up the dirt without dispersing it
Also suitable for carpet cleaning
Can be used anywhere in the home
A cordless vacuum cleaner makes the search for a power socket unnecessary
Perfect for brief intermediate cleaning
Can be hung up on the wall to save space
Makes crumbs and dust disappear immediately
Only suitable for small areas
Always on hand for intermediate cleaning
More likely to disperse dust than to remove it
Picking up dirt using a dustpan is hard on your back
Wood, plastic and natural material: damp wiping
The floor is vacuumed first. When the balls of dust and dirt and the crumbs have been removed, damp cleaning can begin. Parquet, laminate and elastic floors are sensitive to moisture and alkaline cleaning agents. They require damp wiping with a firmly wrung out cloth. Use diluted neutral or weak acidic cleaning agent. Anyone who wants to make absolutely sure they do not damage their floor by using too much water can get by with the FC 5 floor cleaner. Its microfibre roll is automatically only slightly dampened. As it also picks up other dirt, it can save you carrying out the first floor cleaning step too.
Tiles and joints: With or without chemistry
-
Wet wiping: water is not a problem for tiles. Toothpaste and cooking stains can be loosened with lots of moisture.
-
Cleaning grout joints: use citric acid diluted with water to remove limescale deposits. This is gentler on surfaces than vinegar, for example.
-
Rinsing: after cleaning with acidic cleaning agents, always rinse everything thoroughly so that no residue is left behind.
-
Cleaning without chemicals: a steam cleaner, such as an SC 3 Easyfix steam cleaner, reliably combats limescale and bacteria entirely without chemicals.
Five tips for a clean home with pets
Pets bring life to within your own four walls – but also a certain amount of dirt. Whether it's your dog traipsing mud across your freshly washed floor, your cat spilling food next to her bowl, or your guinea pig streaking through his cage sending fur flying through your home. So as not to cloud your joy at living with animals, here are a few helpful cleaning tips.

Keeping cages properly clean:
Just as we keep our own homes clean, we should also regularly remove dirt from the living and eating areas of our pet friends. This means:
- Cleaning bird cages with a brush and hot water – without any disinfectants or chemical cleaners.
- Particularly large cages can also be cleaned with a high pressure cleaner.
- Simply wash cage tubs of hamsters, guinea pigs, etc. in the bath.
- Quickly rinse food bowls after use or put them in the dishwasher.
- Place newspapers around the food bowls of cats, dogs, etc.
Hair everywhere!
Dogs, cats and rodents have one thing in common – they all shed hair. So regular vacuuming and cleaning are crucial. If you don't want to get the vacuum cleaner out every time, why not reach for your cordless electric broom? The sweeper is quick to pick up. A lint remover that animal hair sticks to is designed to clean your couch and sofa in-between times. And to prevent so many hairs landing on your floor and furniture in the first place, you should regularly brush your pets.
Insider tips for your home
All these insider tips make regular cleaner so much easier. Whether your dog has brought his dirty paws into your home, or your cat has left marks on the window - find the right solutions below:
Animal perspective
These are scenarios familiar to many animal lovers: A cat with its paws up against glass door asking to be let out or a dog pressing its snout up the window to watch a squirrel climbing a tree outside. The result: Paw prints wherever you look.
A window vacuum removes unsightly streaks and paw prints from glass doors easily and without much preparation. Simply spray on the detergent, loosen the dirt with the microfibre cloth and vacuum with the window vacuum.

Dirt trap
Whether coming in from a walk, agility training or playing frisbee in the park: to ensure your dog brings as little dirt as possible into your clean home, a dust trap mat for pets is a practical solution.
- for wet feet: Door mats in the entrance area
- muddy paws: Keep a towel by the door
- Foot bath for very dirty paws: Put each paw in the bath in turn, or clean with a cloth
Paw print-free
But sometimes you just can't stop your furry friends from bringing soil or mud into your home. If you don't want to get your mop and bucket out of the cupboard every time you see a few dirty paw prints, how about a handheld steam cleaner?
It heats up quickly and becomes a steam mop with just one click. Another advantage of cleaning with steam is that it uses no chemicals, and so your pets are not exposed to any detergents.
Tips to avoid dust and dirt in your home
It’s something we’re all too familiar with: you've just rid your house of dust, and there's another grey layer of it on your furniture and floors. And so the job starts all over again. It can be frustrating. It's no wonder that we don't like doing these household tasks. Here are some tips for keeping on top of the dirt:

Ventilate against dirt
Increasing the humidity stops dust from spreading so quickly in your home in the first place. Particularly in the winter months, because heating makes the ambient air particularly dry.
So during the cold season, place a bowl of water on your radiators. The water evaporates and so makes the ambient temperature more moist. But only ventilate for a short time, because leaving your windows open for too long lets too much dust from outside into your home.
Microfibre cloths also work well because of their antistatic effect. Because even without moisture, dust particles stick to the microfibre fabric. Which means they are great for use on furniture that is sensitive to water. You do need to be careful with high gloss furniture, however. Microfibres can scratch them, or take the shine off them.
Heavy dirt on shelves and dressers can also be cleaned using a vacuum cleaner with an upholstery brush.
Declare war on dust and dirt magnets
Antique furniture
Antique furniture is a real eye-catcher in the home, but is often also a real dust magnet. However, you should never dust these sensitive items with a damp cloth. For regular cleaning, simply use a dry duster.
Clean ornaments or crevices that are difficult to reach with a bristle brush. Try not to use water even on heavy dirt, and use only suitable detergents on wood or veneer. Always follow the manufacturer's instructions.
Radiators
During the winter, no end of dust accumulates in radiator grooves and fins. A narrow radiator brush gets them clean in no time. If you don't have one at home, stretch a microfibre cloth over a silicone dough scraper to wipe away dust from the gaps.
You can also use a steam cleaner on ribbed radiators. Hold a towel behind and beneath the radiator and clean the gaps using the steam jet.
Carpets and curtains
Carpets, curtains and bedlinen are real dust traps. Carpets therefore need to be vacuumed regularly and bedding shaken out in the fresh air to stop dust particles from settling everywhere in your home.
Wash curtains several times a year. Re-hang curtains when they are still damp to prevent unsightly creases.
Window panes
Moving ladders, dragging buckets: Cleaning high windows, in a conservatory for example, is a very tedious task. Here's a practical solution: The window vacuum extension means even hard-to-reach spots are easy to clean from the ground.
And while squeaky clean panes are half the battle, don't neglect the window seals. Wash them with some water or a window detergent and a cloth. Use a slightly damp cloth and do not squeeze too hard to prevent drops from dripping downwards. Gaps in window frames can also be cleaned with a steam cleaner.
Spring cleaning made easy
Winter is slowly coming to an end, and thorough spring cleaning following the cold months has become somewhat of a tradition for many people. The good intentions are there, and the need to start the year on a fresh note provides the impetus to approach the task of cleaning. But what does spring cleaning entail? And which tools and resources are required? These tips will show you how to get your house looking shipshape quickly and effectively.

What does spring cleaning entail?
When it comes to spring cleaning, allow enough time and decide in advance what you want clean. It is worth writing a list. By spring cleaning in a systematic way, you save valuable time. Ideally you should focus on one room at a time. Generally, things are cleaned from top to bottom in the following order: first dust off all surfaces such as cupboards, tables, windowsills and plants. The second step is to vacuum upholstery and furniture. The floor is cleaned right at the end. Turning our attention to outside the house, cleaning the car and garden furniture is recommended first, before cleaning the terrace and driveway. This avoids unnecessary extra work. The spring clean is also a good opportunity to sort through old things. That is why tidying out and cleaning the garage is also recommended.
Task list
General:
• Clean the windows
• Put the curtains in the washing machine
• Remove cobwebs from walls and ceilings
• Wipe dust
• Clean the floors
1. Kitchen:
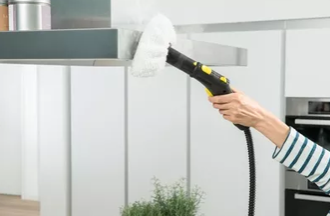
• Clean the oven and microwave
• Clean the extractor hood
• Thaw out and clean the fridge and freezer
2. Bathroom:
• Clean the sink, bathtub and shower, particularly drains
• Clean the toilet
• Clean mirrors
3. Living room:
• Vacuum sofas using an upholstery nozzle
• Clear out and wipe shelves and cupboards
4. Bedroom:
• Air and turn mattresses
• Gently wash bedding or take it to the cleaners
• Wash pillowcases and curtains
5. Outdoors:
• Clean the car inside and outside
• Remove dirt from terrace and driveway
• Tidy up the garage
• Get garden furniture back in shape
What cleaning equipment belongs in my cupboard?
Less is more – this also applies to detergents required for spring cleaning. In terms of basic equipment, the following five cleaning agents are sufficient:
- Multi-purpose cleaner
- Cream cleaner
- Glass cleaner
- Dishwashing detergent
- Acid cleaner
Alongside the right cleaning agents, a few tools are required which every cleaning cupboard should have. These include a dustpan and brush for dirt on small surfaces. A wiping mop and bucket are required for wiping floors. Cleaning sponges are good for removing dirt. For dusting, a feather duster is essential. You should also have both soft cotton cleaning cloths and microfibre cleaning cloths at your disposal. Using the colour system used by professional building service contractors is recommended: red for the toilet, yellow for bathroom surfaces, green for the kitchen and blue for all other surfaces and furniture.
How to make spring cleaning easier
If you want to make spring cleaning even easier, you can use cleaning devices:
- The FC 5 combines vacuuming and wiping into one task.
- Without chemicals or large time investments, a steam cleaner dissolves dirt from various surfaces.
- The Window Vac WV 5 can quickly produce streak-free results on smooth surfaces.
- The vacuum cleaner VC 5 with soft furniture brush makes dusting furniture extremely easy.
- The cordless electric broom KB 5 is a quick and simple alternative to a dustpan and brush.
- If you want to save time and have fun cleaning outdoor areas, you can turn to the K 5 Full Control Plus pressure washer.
There are usually quite a few different cloths in the cleaning cupboard. But which one should you use for dusting? When combatting the grey stuff, a soft, slightly damp cotton cloth works best, so that dust is not kicked up during wiping. Thanks to their antistatic effect, microfibre cloths are also well suited to the task. This is because dust particles adhere to the cloth without the need for moisture. They can therefore be used on water-sensitive furniture in particular. But be careful when it comes to high-gloss furniture. It may be scratched or become matt as a result of microfibre cloths. Coarse dirt on shelf surfaces and dressers can also be removed using a vacuum cleaner with soft furniture brush.
Following the winter months, cleaning windows is recommended so that the spring sun can find its way into your home. The important thing is to ensure no liquid stays on the glass after cleaning, since this can result in unsightly smears. These can be wiped away using a microfibre cloth. Fast, streak-free results can also be achieved with a Window Vac. This little helper cleans windows in a flash and the dirty water ends up in the tank rather than on the floor, thanks to the handy suction function. Window frames and windowsills must also not be forgotten when cleaning.en.
The vacuum cleaner is the popular alternative for cleaning. Unlike a brush, which kicks up dirt, it makes short work of crumbs and dust particles. This is important prior to wet cleaning as very coarse dirt cannot be picked up completely or can even leave visible scratches on sensitive surfaces such as parquet. Those who wish to save themselves this extra step can use the floor cleaner FC 5 from Kärcher, which vacuums and wipes in one step.
Moisture, cold air, wet dirt and especially road salt – winter is a hard time of year for cars. This aggressive mixture can speed up the formation of rust. This is why thorough car washing is part of spring cleaning. This is quick and thorough with a pressure washer.
For this purpose, a flat jet should be used at a distance of about 30 centimetres from the surface. As far as possible, the underbody and wheel arches should be cleaned. Using a detergent makes it easier to dissolve dirt, which then only needs rinsing off. If you prefer to use a wash brush, the car should first be sprayed over completely so that stones and other dirt cannot scratch the paint.
Before washing the car, it is definitely worth finding out whether car washing is allowed on the street or private plot of land, as the laws can vary according to the Federal State, city or municipality. The possibility of polluting the groundwater should always be ruled out.
The tiles on the balcony, terrace and paths in front of the house are constantly exposed to weather. This often results in unpleasant dirt. Moss, lichen and greenery can be thoroughly cleaned in a flash using a pressure washer.
Ferrous objects such as garden furniture or lights lying on the ground and getting damp for extended periods of time may cause rust stains to develop. Acid-resistant stones such as granite or slate can be treated with citric acid. For acid-sensitive stones such as marble, a special acid-free rust remover is required.
Garden furniture in storage should be wiped off after the winter using water and dishwashing detergent in order to remove dirt and dust. High-pressure cleaning makes it faster. The additional use of a detergent that has a gentle effect on the surface is also recommended.
Garden furniture padding is subjected to sun and rain. As such, delicate materials and colours should be sprayed with a special stain guard. Synthetic fibre covers are easy to wash, whereas cotton covers should be cleaned chemically.
Whether Douglas fir, Bangkirai wood or modern wood polymers – dirt gets stuck in natural structures more easily and is more difficult to remove than from smooth stone floors. In this instance, it is best to use a pressure washer. This allows for a gentle cleaning procedure – especially on wooden surfaces.
Through the use of a flat jet nozzle and spray lance, water pressure can be adjusted to match the material. Surfaces should be painted with a special wood varnish following cleaning. This protects against weathering and freshens up the colour.
Tips for outside
EFFORTLESS AND FAST DE-ICING OF CAR WINDOWS
In the winter, car drivers who don't have a garage are only too familiar with the problem: frozen windows. Especially in the morning, the de-icing of windows is a time-consuming and stressful activity. Here are a few tips to help make the process fast and effortless, while avoiding wet hands.

How can car windows be de-iced quickly?
Quickly get into your car and drive off to work in the morning? It's often not possible in the winter, because first you have to de-ice the windows. Many people often resort to the classic ice scraper. But there's also a faster, easier way: With the electric ice scraper EDI 4, car windows can be freed from ice within just a few minutes
De-icing car windows with the EDI 4
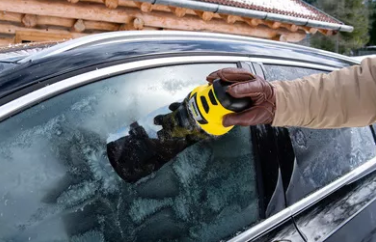
The battery-powered EDI 4 comprises a disc with six plastic blades that rotate quickly to remove the ice. Exhausting scraping is no longer necessary, because the electric ice scraper does the work almost on its own. How it works:
- Hold the EDI 4 in your hand and switch on the device so that the green LED lights up.
- Remove the safety cap.
- Position the ice scraper on the window. Press lightly so that the disc starts to rotate.
- At the same time, move the device evenly over the window to be de-iced, applying only light pressure and preferably moving from the top down – you can then see better which areas have been de-iced. In event of very hard ice, hold the device at one place until the ice is removed.
- When all the windows have been de-iced: Switch off the EDI 4, remove it from the window and fit the safety cap.
- If necessary: Brush the loosened ice from the windows with a soft hand brush.
De-iced windows in three minutes
Within just three minutes, the front windscreen, rear and side windows can be freed from ice with the EDI 4. A battery charging of 15 minutes is therefore sufficient for the whole working week.
The EDI 4 is ready for immediate use, even at very low temperatures down to -20°C. It can therefore also be stored in the car without problem. Thanks to its compact size, it even fits into the glove compartment or side door compartment.
The EDI 4 is charged by means of a cable included in the scope of supply. The full charging time is three hours, after 2:20 hours the battery is already 80 per cent charged. With a single charging, de-icing can be carried out for up to 15 minutes.
As soon as the LED display starts to flash, the battery should be recharged.
- The EDI 4 automatically switches off after 30 seconds, and can be reactivated by a single press on the on/off button.
- The rotating disc is made of plastic similar to conventional ice scrapers. Nevertheless, it must be ensured that the EDI 4 is used only on clean car windows. If there is dirt on the window, the rotating effect may lead to scratching.
- A small distance should always be maintained between the device and the edge of the window.
Yes, the rotating disc can be replaced when it is worn. As it is only press-fitted, it can be easily removed and refitted. To protect the disc, the EDI 4 should always be stored with the safety cap in place.
The EDI 4 is as loud as a conventional ice scraper. However, as the ice is removed more evenly, the noise is more pleasant than the noise caused by manual ice scraping.

Additional tips against frozen car windows:
- The use of an ice protection foil can prevent ice and frost on the windscreen. In this case, only the rear and side windows need to be de-iced – thus saving time.
- At night, lift the windscreen wipers from the windscreen so that the blades don't freeze and get stuck.
- Never pour hot water onto car windows, as the rapid temperature change may result in cracking.
CLEARING LEAVES: FIVE TIPS FOR THE AUTUMN
The summer is over, the trees are resplendent with colour – but with the autumn, the leaves also get into our gardens. Clearing leaves from paths, driveways, lawns etc. with rakes and brooms is often very bothersome. With the following tips, you will be able to clear the leaves from around your house quickly and with minimum effort.
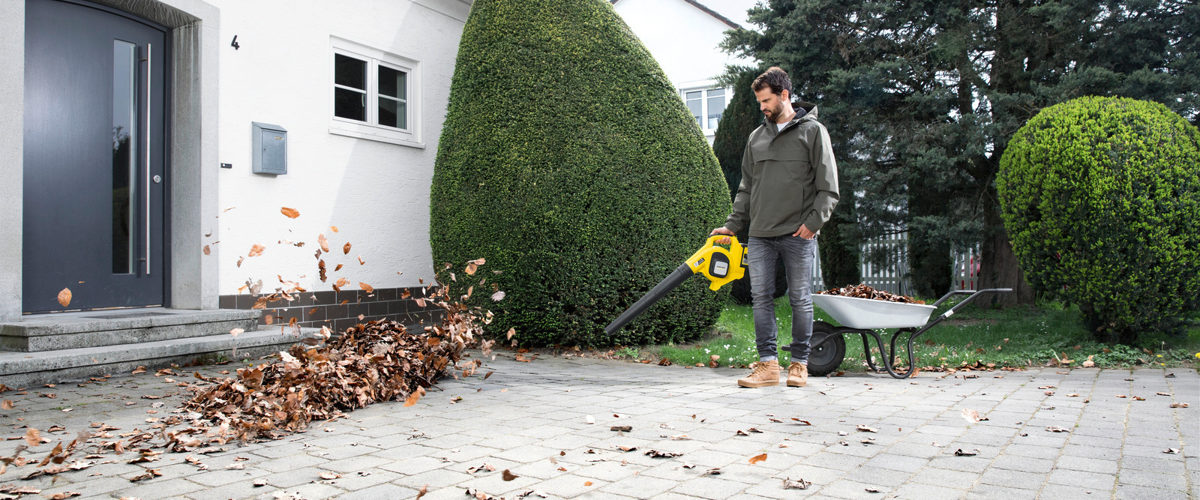
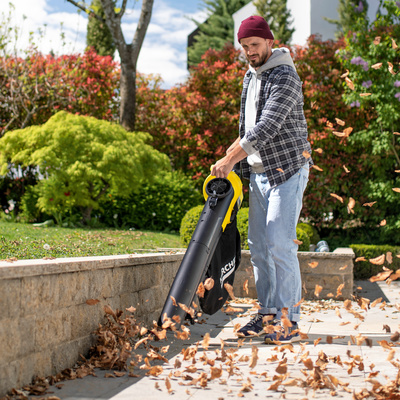
Tip 1: Leaf blower instead of rake

Raking was yesterday: Leaf blowers help to clear leaves effortlessly from paths, roads and lawns. Thanks to the powerful air flow, they can be used to eliminate leaves from hard-to-access areas, flower beds or soft surfaces literally as fast as the wind.
The leaf blowers LBL 2 and LBL 4 have a detachable flat jet nozzle, with which leaves can be blown into a pile, for example. A scraping edge is attached with which wet leaves or compacted dirt can be loosened. In addition, with the LBL 4 the speed can be regulated in two stages. In order to store the leaf blower in minimum space, with both devices the blowing tube can be detached.
An all-round talent

By the way, leaf blowers are suitable not only for clearing leaves in the autumn, but also for other tasks in the garden all year round, e.g. for clearing:
- Green waste after cutting bushes and hedges
- Weeds after weeding work
- Grass after mowing
- Dirt from the garage
- Old leaves and blossom that have fallen into flower beds.
Tip 2: Sweeper instead of broom and dustpan
For clearing leaves from larger areas such as pavements, roads and driveways, sweepers are practical: With the movement of the sweeper, leaves and dirt are collected in the waste container – without the need to bend down. This is ensured by one or two side brushes, depending on the model, which can also pick up leaves effectively from edges. As an option, side brushes for damp leaves and waste can also be fitted. They are provided with harder bristles and are therefore ideal for sweeping up wet leaves stuck to the ground. With all models, the waste container can be simply removed and emptied after the sweeping, without the need for the operator to come into contact with the leaves.
If sweepers have a folding push handle, they can be stored upright in the cellar or garage, taking up very little space. It should also be ensured that the push handle is height-adjustable, thus ensuring ergonomical work.
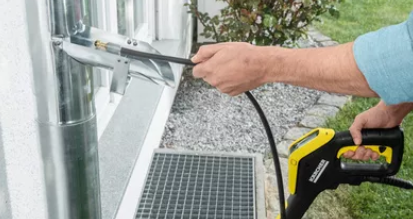
Tip 3: Clean pipes regularly
Leaves collect not only in the garden, on roads and paths, but also in rain gutters and drainpipes. Once the leaves have been compacted into a thick mass, water can no longer flow through and seeks another route. Expensive water damage can be the consequence. Regular checking and cleaning of gutters and drains are therefore recommended.
Blockages in drains and pipes can be cleared with a roof gutter and pipe cleaning kit. The set is simply connected to the pressure washer and the high-pressure hose is inserted into the pipe or drain. A special pipe-cleaning nozzle with four high-pressure jets facing backwards then loosens the compacted leaves and the water can then again drain freely.
Tip 4: Dispose of leaves properly
Leaves should be disposed of at a green waste collection point at the recycling depot. Organic waste bins are allowed, but are not always suitable on account of their low capacity. In some places there are special sacks or baskets for leaves, which are emptied by the local council. Leaves should never be disposed of in waste or paper containers.
The burning of leaves is prohibited in most municipalities, and is even subject to fines. This is because, on account of the high water content of leaves, burning results in the generation of heavy smoke and bad smells. Burning dry leaves can also result in the fire spreading rapidly. In addition, fine dust particles are released into the environment.
Tip 5: Comply with legal regulations
There are legal regulations for removing leaves which must always be complied with. In many municipalities, for example, it is the obligation of house owners to clear leaves from the pavement in front of the house. In this case, if the owner does not clear the leaves, he will be financially liable if a pedestrian slips on wet leaves and injures himself.
For example, the German Equipment and Machine Noise Protection Ordinance specifies when leaf blowers can be used: For reasons of noise protection, on weekdays only between 9:00 and 13:00 and between 15:00 and 17:00. At all other times, including on Sundays and bank holidays, the use of leaf blowers is prohibited.
Automatic garden irrigation: TIPS ON ORGANISED PLANT CARE
A garden full of plants is beautiful, especially in summer. Yet this is the time when gardens also require a lot of work to keep them looking this way. Watering systems and compatible water timers make easy work of this – and they even turn worrying about the garden when on holiday into a thing of the past.

How much automation do you need?
People with gardens full of plants face a major challenge, especially in the height of summer: Watering plants regularly and according to their needs. Some people love taking matters into their own hands using spray lances and spray guns. Others would rather spend their free time doing something else. Installing watering systems could end their predicament. Initial planning and installation may prove costly, yet the amount of free time gained from this is priceless. And when you are on holiday, any worries about the garden can simply be cast aside.

A good starting point: Watering systems
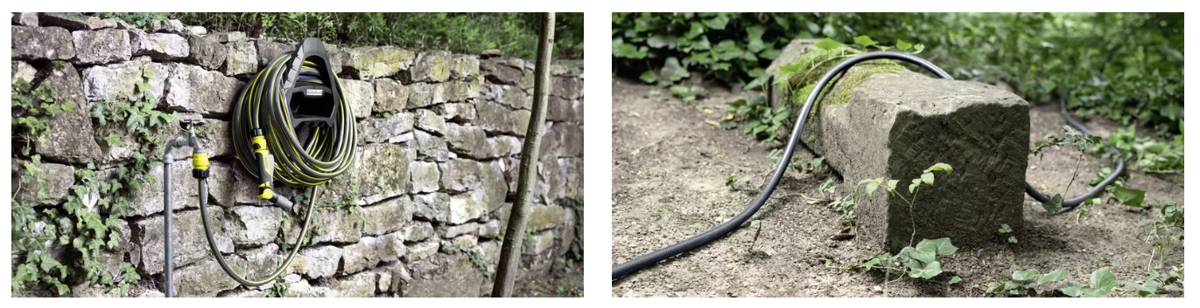
Installing a watering system in the entire garden can help deliver targeted moisture to hedges, flowerbeds, shrubs and herbs. When used sensibly, it can water plants individually and according to their needs. The main component of this kind of watering system is a special hose, which can be lengthened or shortened and fitted with micro spray nozzles depending on your requirements. To get you started, we recommend buying a starter kit, which includes a hose as well as a filter, various connection parts and nozzles.
Make sure to lay the hose in such a way that all garden areas that need watering are covered. Position the micro spray nozzles at points on the hose where you want water to be dispersed later. Depending on the type of nozzle used, you can water plants at an angle of 90, 180 or 360 degrees. And you can even regulate the volume of water used to suit your requirements. In addition to micro spray nozzles, you can also use drip nozzles, which slowly release water from the hose in drops. You can use sealing collars to seal the hose in places that no longer require watering. A special trickle hose is suitable for slow-release watering of hedges and shrubs, for example.
 Lay the hose in the garden in such a way that it can reach all plants needing watering. If the hose is too long, you can shorten it using a pair of scissors.
Extend the watering system to your heart's content using a connection set with T- and I-connectors as well as hose stops. Connecting a second system is also possible.
Use the hose stop to seal off the (trickle) hoses securely. Simply fit it to the end of the relevant hose with no tools required.
A particle filter must be fitted to the start of the hose. It prevents small dirt particles entering the system and can easily be removed and cleaned.

Use hose spikes to fix the hose in the ground. The attachment points on the spikes feature integrated rubber rings which provide optimal hold.
To fit micro spray nozzles, simply stick the open nozzles' integrated needle into the hose and close them to hold them in place.
Use the particle filter's tap adapter to connect the watering system to the water supply. It is compatible with all known click systems.
Use sealing collars to seal nozzle holes that are no longer needed. To do this, stick the integrated pin into the hole you want to seal and close the nozzle.
Important note:
You should dismantle the watering system, especially the nozzles and connectors, before winter. The trickle hose can remain in the garden over winter provided it has been drained of water beforehand. This is especially practical if the hose has been buried under a layer of bark mulch. Make sure to keep a detailed drawing of the garden, the beds and the plants to make reassembling the system in the spring easier. The drawing should also detail where exactly hoses were placed and where nozzles were positioned.
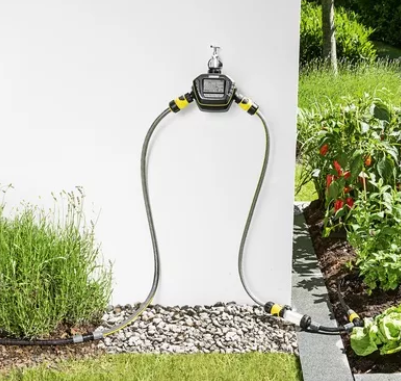
Self-service for plants: Water timers
Supplying plants with water using the installed watering system can be done manually or using water timers. Simply connect these between the water supply to your home and the watering system. Depending on the model, water timers feature low to high degrees of automation – from a simple clock to a sensor control system:

WT 2 Watering Clock
The WT 2 has two tap adapters with independent, continuously variable controllers. A watering clock is integrated in the third tap connector, which allows the watering time to be set continuously up to 120 min. Watering stops automatically once the set time has elapsed.
WT 4 water timer
You can program the watering time and duration as necessary using the WT 4 water timer. The watering duration is limited to a maximum of 120 minutes. Watering stops and starts on time and automatically at the preset time.
WT 5 Water Timer
The WT 5 has four modes: Automatic watering, manual watering, countdown watering, and 24-hour break function. In automatic watering mode, it waters plants at the programmed times (programmable for each day of the week, up to two cycles) with the previously set watering duration.
SensoTimer ST 6 ecologic
Using a radio sensor, the SensoTimer ST 6 eco!ogic intelligent water timer knows how much water plants need and waters them based on moisture levels. You can set up to two watering times per day. You can also delay watering by up to seven days with the eco!ogic function.

WATER ON! DIY TIPS ON WATERING THE GARDEN
It is the height of summer. When temperatures climb to over 25 °C, not only humans need more water, but our plants in the garden do too. Especially when there is no rain on the horizon for days. Watering is a wonderful yet somewhat laborious task for garden enthusiasts. Using the right equipment makes watering easy and ensures that flowers, vegetable crops and shrubs make it through the warm summer season without any casualties.
Individually watering your garden in four steps
If watering plants, shrubs and the lawn in your garden with a watering can is not for you, you are spoilt for choice, because there are countless types of hoses, sprinklers, spray guns and pumps for you to choose from. But which piece of equipment will meet your personal requirements? And what should you look out for when using hoses, etc. for watering?
Generally, garden owners should ask themselves four questions:

What source will be used for watering?
In principle, the water needed for watering for garden can come from numerous sources: Whether it is water from the tap, collected rain water from a butt or water from a cistern or well. It is worth using alternative sources in many ways, because tap water is precious and costly.
How will the water reach the consumer (sprinklers, etc.)?
In order to be able to use rain water from cisterns or water butts for watering, you will need a pump. A barrel pump fitted directly on the rim of a water butt would be a suitable option here. Alternatively, you can use a garden pump (booster pump) which can extract water from cisterns easily.
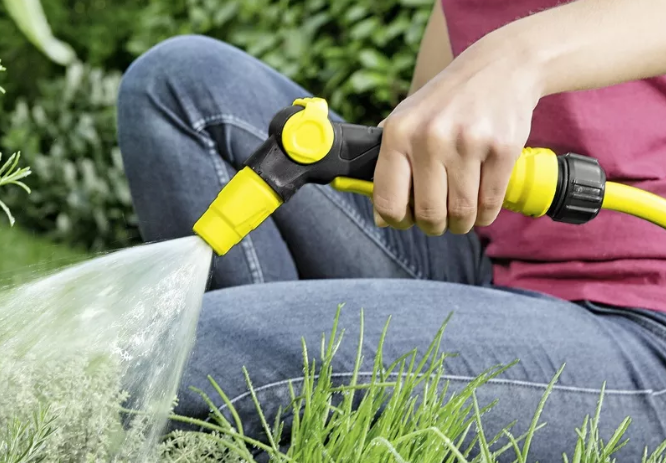
What will be used for watering?
You can use nozzles, spray lances and sprinklers to water plants. Depending on which model of nozzle and spray lance is used, you can regulate the volume of water and set up numerous spray types or spraying patterns. The shape of the lawn or beds should be taken into account when choosing a sprinkler (for example, rectangular, round or circular sprinklers).
Will a control unit be used for watering?
You can control watering automatically and according to your plants' needs using water timers. Among other things, this way you can set when and on which days watering should begin and how long it should go on for.
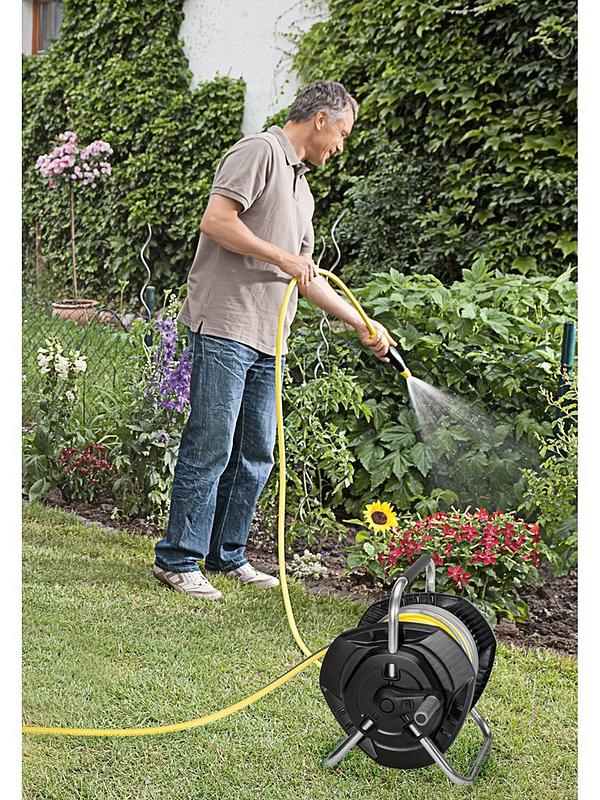
Finding the ideal hose
No hose, no watering. When selecting a suitable garden hose, numerous factors must be taken into account: The length and diameter of the hose as well as how it has been made. A length of 20 to 50 metres is standard. So that you choose the ideal model, you should – prior to purchase – measure how much ground the hose needs to cover from the water connection to the bed.
 Garden hoses are available in various diameters. As a rule of thumb: The larger the diameter, the higher the flow rate (volume of water that can pass through the hose at any given time). A larger diameter also means more weight and therefore more difficult handling. Consequently, hoses with a smaller diameter (for example, ½") are recommended for almost all gardens – especially when you need to water the garden manually. However, those using numerous points of use, often at the same time, should pick a hose with a larger diameter (for example, ¾"). This also applies to hoses that will remain in the ground permanently.
With regards to how hoses are made, they differ in feel, robustness, weather and temperature resistance, bursting pressure, kink resistance and torsion. Kärcher's three models, PrimoFlex, Performance Plus and Performance Premium, cover a wide range of requirements. The basic model, PrimoFlex, is robust, kink-resistant and temperature-resistant, whereas Performance Plus hoses are also very flexible thanks to their multi-layered woven material and have a good feel. Performance Premium hoses also feature anti-torsion technology, which makes it difficult for the hose to twist, therefore making handling much easier.
Note: Kärcher's hose connection systems (connectors) are compatible with all hoses regardless of make and model and fit hoses from ½" to ¾" in diameter.
When the watering is done: It's time to get organised
You should stow the watering equipment away neatly once you have finished working in the garden. Hose reels, boxes or fixtures on the walls of the house and mobile trolleys make quick work of this and ensure that everything is in the right place.

The dos and don'ts of watering
Water plants in the morning. The best time for watering the garden is in the morning/before midday. Water can seep into the ground slowly when temperatures are still low and plants can absorb it in the midday heat – which is when they need it most.
Water plants close to the ground. Watering plants from the top is quicker, but most plants are unforgiving of this – flowering plants and vegetables in particular prefer being watered close to the ground. Plants with dense foliage, such as roses, will often develop fungal diseases when leaves do not dry quickly enough.
Occasional, yet plenty. When it comes to watering, the name of the game is: More water instead of more often. If watering occasionally, yet always generously, water can seep deeper into the soil. This encourages plants to develop longer roots, which helps them overcome dry spells better.
Recognise plant requirements. In order to develop a feel for how much water a plant needs, you often only need to take a look at its leaves: Numerous thin and soft leaves indicate a high demand for water. Plants with thick, hard or hairy leaves require less water.
Keep an eye on the soil. How often you need to water plants depends on the type of soil you have in your garden, in particular: Clay soil stores a lot of water, for example, and therefore only needs occasional watering. Sandy soil can hardly store any water, which makes frequent watering a must.
Avoid using very cold water. Cold tap water causes stress for most plants. Using stagnant water that has been heated by the sun is a better option. From a water butt, for example. Yet tap water itself is not damaging to most plants – except for when it is extremely calcareous.
WOODEN PATIO CLEANING MADE EASY
Eating outdoors, sunbathing or simply sitting together quietly – for many people, a wooden patio is like a second living room during the warm months. To really enjoy the hours spent out there, the surface and surrounding area need to be thoroughly cleaned on a regular basis. Experts recommend cleaning the wooden surface twice a year – in spring and autumn. Once this is done, the patio will look like new.

The correct way to clean wooden patios
Wooden patios should be 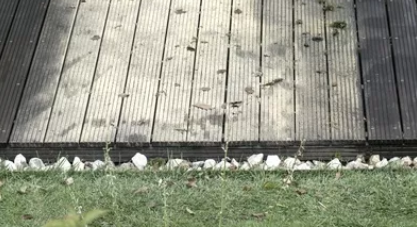 cleaned regularly. There are several reasons for this:
- Greying is eliminated or reduced
- The patio retains its decorative appearance
- Green growth such as moss is removed
- The wood does not become slippery
- Scattered dirt does not create wet/damp areas
- Aggressive fungi cannot spread
Depending on the type (hardwood or softwood), wood can be sensitive to powerful mechanical processes, which means the cleaning method and equipment should be chosen carefully. To make sure that you have chosen the right method, it is advisable to carry out an initial test on an area that is hidden from view.
Uniform and efficient cleaning with the PCL 4
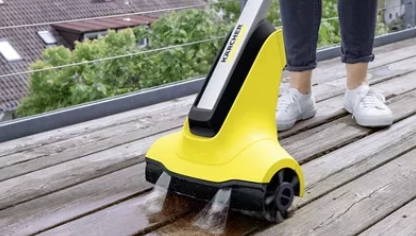
Manual patio cleaning is particularly easy with the electrically-powered PCL 4 patio cleaner. Two rotating brushes and integrated water distribution remove even the most stubborn dirt effortlessly, thoroughly and evenly.
The device simply needs to be connected to a garden hose and the low-pressure, gentle cleaning of the patio can begin. Above the two electrically-driven roller brushes are two water nozzles, which remove and wash away the dirt in a single step without having to apply pressure. The water supply can be manually adjusted via a valve to reduce water consumption. As the powerful motor is fixed in the centre of the machine and the brushes can reach right up to corners and edges, dirt along house walls, for example, can be removed easily.
With its replaceable brushes, the PCL 4 is suitable for both wooden and stone surfaces.
Step by step to a clean patio

Set up the device
Before cleaning can begin, the PCL 4 must be connected to the water and power supply.
Open the water supply
Next, the water supply can be opened and regulated as necessary via the valve on the spray gun.
Clean evenly
To start cleaning, press down the spray gun and move the PCL 4 evenly in strips across the surface.

Remove and rinse
Dirt is removed by the roller brushes that rotate backwards and then washed away directly by the water stream. With the motor fixed in the centre of the machine, it is possible to clean right up to the edge of the patio.
Replace the roller brushes
The roller brushes can be replaced simply and without tools. To clean stone patios, replace the standard brushes with special roller brushes designed for stone.
Set down the device
The PCL 4 features a storage rest on which the device can be placed when taking a break from work. Simply tilt it forwards slightly and lean it against a wall – this preserves the roller bristles.
Patio cleaning with the pressure washer
Step 1: Apply detergent
Coarse dirt on patios can be removed particularly efficiently if a wood detergent is first applied to the surface using the pressure washer, e.g. the Vario Power spray lance. The Wood Cleaner 3-in-1 not only cleans thoroughly, but also provides UV protection as well as a natural wax component that preserves the wood and protects against dirt and moisture. Cover the surface evenly with foam and allow the detergent to work for two to five minutes.
Step 2: Scrub the patio
To clean the patio thoroughly, first remove the flat jet nozzle and attach the power scrubber to the pressure washer. The use of the scrubber is particularly advisable on wooden patios, as the fine bristles can reach into the grooves on the surface. The brush also contains three high-pressure nozzles, which increase the cleaning performance of the scrubber considerably. Now move the power scrubber forwards and backwards while continuously adding water. Always scrub in the direction of the grain, i.e. along the length of the wood and not across it.
Step 3: Re-apply detergent
For protection that lasts longer, the Wood Cleaner 3-in-1 can be re-applied. To do so, re-attach the spray lance to the pressure washer, apply the detergent evenly to the wooden surface with the flat jet nozzle and leave it to work (see step 1).
Step 4: Rinse down the patio
Finally, rinse down the wooden patio with the flat jet nozzle in the direction of the grain. When cleaning wooden patios, only work with the flat jet nozzle, as point jets or dirt blasters apply greater pressure to the wood and could cause damage. Maintain a distance of 30 centimetres from the floor surface to achieve the ideal rinsing effect. Then allow the patio to dry.
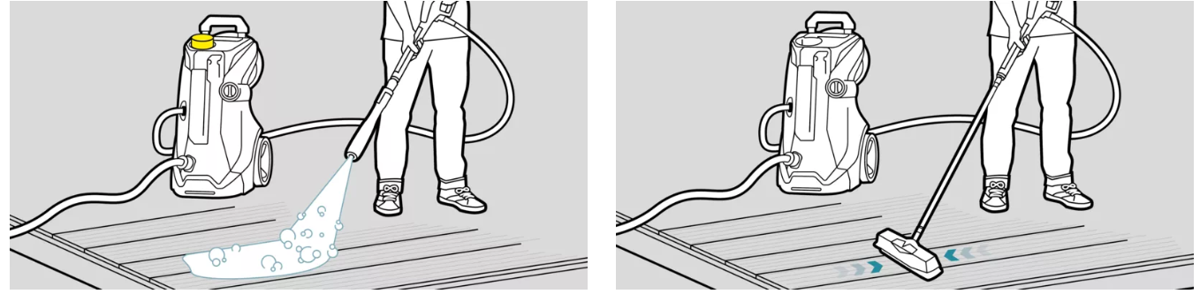
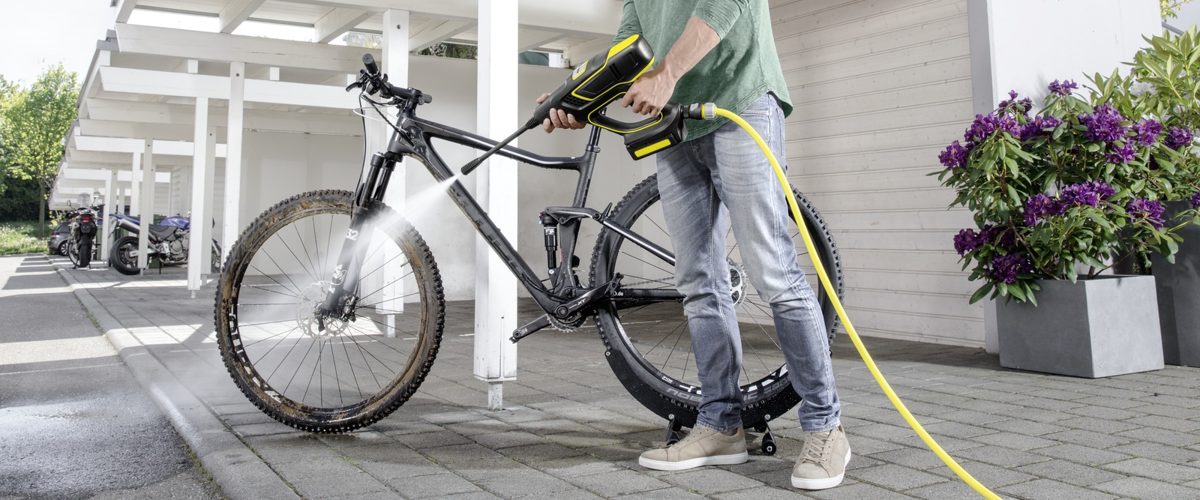
BICYCLE CLEANING: CARE TIPS FOR AT HOME AND on the go
Many people are drawn outdoors again in spring when the days start to get longer and the weather gets better. The bicycle is often present. However, following a trip through forests or meadows or on dirt tracks or dusty roads, a thorough cleaning of the bicycle is in order. Because anyone who wants to have fun on their mountain, city or electric bike for as long as possible should take good and regular care of their bicycle. With the right device and the appropriate accessories this is a piece of cake – whether in front of the garage, in the garden or on the go.
Cleaning the bicycle at home
A few utensils are required for thoroughly cleaning the bicycle at home:
- Bicycle stand or a wall
- Cleaning device of your choice
- Detergent
- Soft cloth (e.g. microfibre)
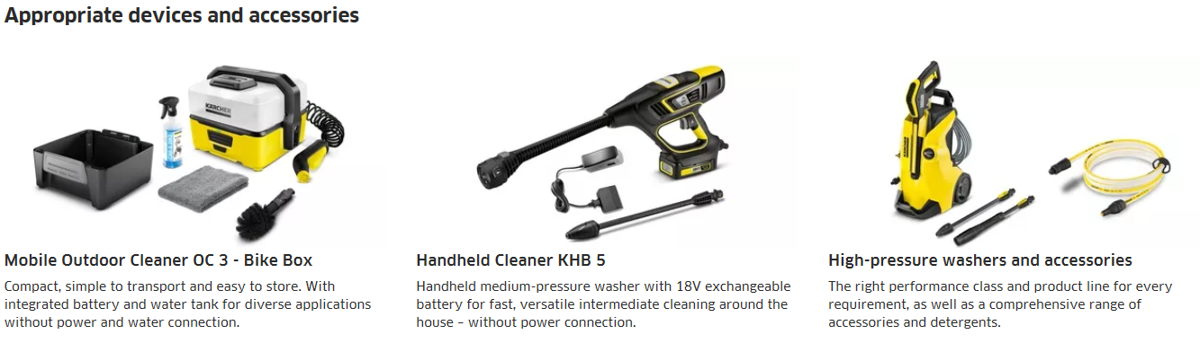
A pressure washer or the KHB 5 medium-pressure washer are suitable cleaning devices. While the pressure washer generally has to be connected to the power and water supply, the handheld medium-pressure washer is battery-powered and therefore only needs the water connection. It is also suitable for the fast intermediate cleaning of the bicycle in the garden and wherever there is no power connection nearby.
Wherever there is no water connection available, pressure washers in classes K 4 to K 7 and the KHB 5 can suction water from a barrel or canister. All that is needed is a compatible suction hose for the pressure washer or medium-pressure washer as an accessory.
Cleaning the bicycle on the go
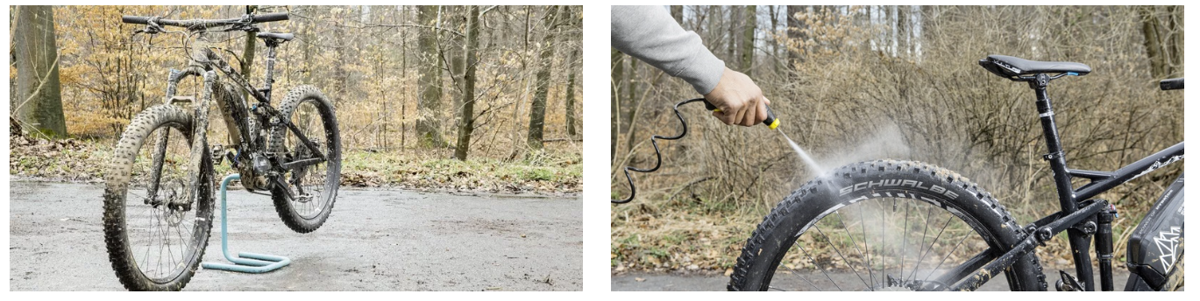
The Mobile Outdoor Cleaner OC 3 is suitable for cleaning dust and dirt from the bicycle on the go, so that, for example, the boot of the car does not get dirty. Thanks to the compact dimensions it even fits into a bike basket, the handpiece and the 2.8 metre long spiral hose are stowed under the removable 4-litre tank without taking up too much space.
In order to clean with the OC 3, simply remove the tank and fill with water, take the spray gun from the device and secure the tank again properly. Then aim the spray gun at the bicycle and pull the trigger. The lithium-ion battery has a runtime of 15 minutes. Using the vehicle adapter, the OC 3 can also be operated with the car battery.
The optional bike box contains a universal brush, detergent and a microfibre cloth – in other words, everything you need for the fast intermediate cleaning of the bicycle. With an appropriate suction hose, water can also be pumped from a canister.
First of all, position the bicycle on level ground and either clamp it into an assembly stand or lean it against a wall or big tree.
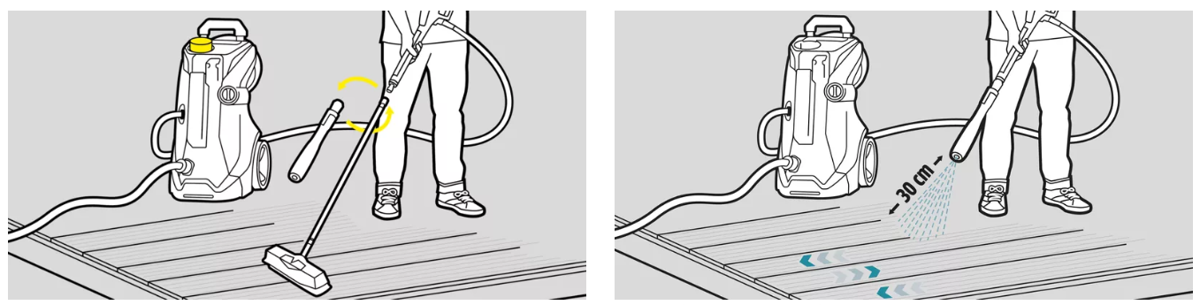
For cleaning on the go: remove the OC 3 tank, remove spray gun, secure tank again and switch on device. For cleaning at home: connect pressure washer or KHB 5 to water supply and, if necessary, the power supply and switch on device. The flat jet nozzle should be used on all devices for bicycle cleaning.
Now hose down the bicycle with the OC 3, KHB 5 or a pressure washer. Do not aim the water stream directly at the bearings, shock absorbers or electrical connections, e.g. for e-bikes. When cleaning with high pressure, maintain sufficient distance to tyres and small parts (approx. 30 cm).
Tip: If cleaning from bottom to top, it is easier to see where the bicycle is already clean.
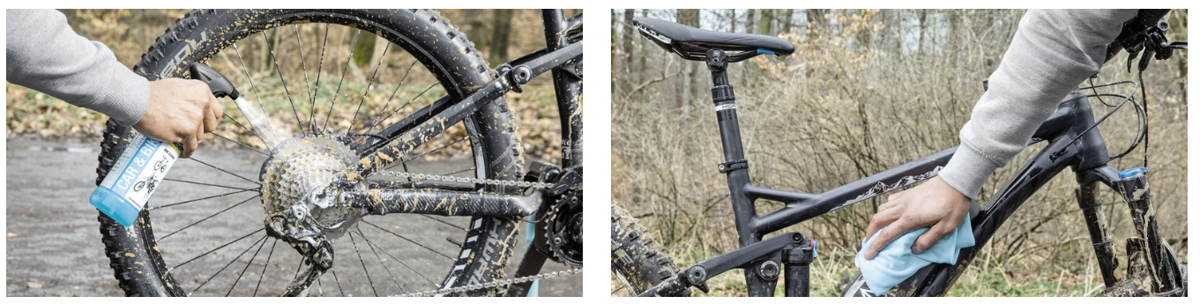
In the case of stubborn dirt, it is also advisable to use a detergent. The Bicycle Cleaner 3-in-1, for example, is suitable: before cleaning apply the detergent evenly to the dirty areas, leave it on for a short period and then rinse off.
Important: To protect the environment, the detergent should only be used on sealed floors (e.g. asphalt) with feed line to the sewer system.
If there is still a greyish haze on the frame, this can be quickly removed using a wash brush. Then rub the frame dry at the cleaned areas using a soft cloth (e.g. microfibre). Oil the chain and gears again after cleaning.
Tip: In order to save water when cleaning with the OC 3, dampen the universal brush and scrub the bicycle. Then hose down the loose dirt.
GETTING EVERYTHING CLEAN AFTER CAMPING, HIKING, SURFING AND CO
So, it's time to pack your hiking boots or bike and head off to the countryside. It is just one of those things that equipment gets dirty. To get rid of dust and mud in next to no time, Kärcher has a practical aid and some useful tips for almost every holiday situation: the mobile, OC 3 low-pressure cleaner.

Cleaning wetsuits and surf equipment

If you don't want your wetsuit’s fabric texture to change, you should quickly remove all salt water residues from your equipment after surfing in the sea. As there often is no suitable water source for rinsing on the beach, the Mobile OC 3 Outdoor Cleaner is particularly suitable for cleaning on site.
Practical side-effect: You can remove the sand at the same time. However, before cleaning the suit, make sure that it is completely dry. Depending on the fabric, you might need some patience. You'll speed things up if you turn the suit inside out.
Cleaning hiking shoes properly

Start by removing the worst dirt with the OC 3 water jet and, where necessary, use a brush. For a thorough clean, also remove the shoelaces and insoles.
Wash the inside of the shoe with water and detergent and then rinse it with clear water.
For drying, stuff the shoes with newspaper and never place them directly in the sun or under a heater, as this could damage the material.
Afterwards, apply the appropriate shoe care wax.
Clean camping equipment

Before going home or continuing to your next destination, your camping dishes, folding chairs or other utensils need to be cleaned. So quickly rinse off everything with your OC 3.
Depending on how much there is to clean, the 4 litres of water from the tank will be enough, or you can use the suction hose from the Adventure-Box. It can suck water out of a large canister or bucket. If the battery is running low at the end of your holiday, simply use the car adapter and work with the car battery's power.
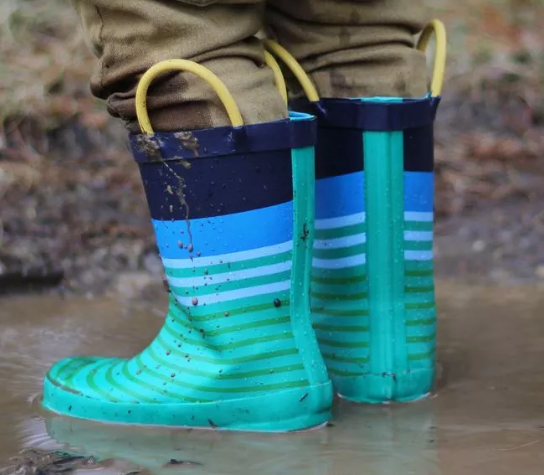
Dirt lock for home use
Once you've completed your walk in the mud with the little ones, and have returned home again, rain trousers, anorak and rubber boots can be washed off right in front of the house. When you have a garden hose handy, you can also use the low-pressure cleaner.
This way, the dirt stays outside The same goes for kids' bikes, scooters or other toys. However, in the entrance area, floor mats are an absolute must, and an old towel often works wonders.
D-I-Y Car washing
Is it getting ever more difficult to see out of your car's dirty windscreen? Or have your little ones left vast quantities of biscuit crumbs and juice on the back seat yet again? It is at this point that you know it is once again time for a thorough car wash. When you have the right equipment, this is quickly done – and it's fun too.

Clean step by step
-
First, moisten the vehicle with a layer of detergent to loosen the coarse dirt. Also manually spray on rim cleaner if required.s required.
-
Afterwards, remove the coarse dirt with a high-pressure jet.
-
Then clean the car with a soft wash brush such as the WB 60 or the WB 150 Power Brush.
-
To finish, rinse the car with water and leave it to dry. Anyone who wants to be particularly thorough can also dry the car with a chamois leather.
-
Any small blemishes or scratches that you notice while cleaning can be touched up using a paint stick.
Important instructions for use for the high-pressure cleaner:
-
When cleaning your car, always use the flat jet and not the rotary nozzle.
-
You should keep a minimum distance of 30 cm away from the surface.
-
Always clean from bottom to top so as not to miss anywhere and to make optimal use of the detergent's effect.
 For pre-cleaning, remove any coarse dirt with the high-pressure jet.
With the pressure washer, you can even remove dirt from wheels and rims. With the Vario Power Jet Short 360° spray lance and its adjustable 360° joint, even hard-to-reach areas such as the wheel arch can be cleaned.
Afterwards, clean the rims with car shampoo and a sponge.
Narrow gaps in rims or between spokes can be thoroughly cleaned using a rim brush. To tackle stubborn dirt, spray rim cleaner onto specific dirty spots.
An interior to feel good in
If the car is shining on the outside, it's time to spruce up the interior:e next:
-
First, remove all loose mats and carpets from the car and beat the dirt out of them.
-
Then remove all coarse dirt from the entire interior with a multi-purpose vacuum cleaner.
-
When vacuuming, do not forget any of the crevices or compartments in the car. Use the different nozzle attachments for this.

Smooth leather surfaces
As a rule, leather seats are easy to clean. It is usually enough to use a slightly damp cotton or microfibre cloth.
To remove stubborn stains, use a diluted household cleaning agent or a leather cleaner.
After cleaning, a special leather care agent should also be applied.
Textile surfaces
Hot water with a common cleaning agent is all you need to clean textile seat cushions.
Apply the detergent with a terry cloth or a microfibre wash mitt and rub it back out of the car seats with a dry towel.
It is even easier to clean with a spray extraction machine.
Plastic surfaces
Plastic parts such as fittings and handles can be freshened up in no time with the right care agent.
Spray the agent directly onto a microfibre cloth and rub it over the surface.
Take extra care around the airbag: The wrong agents could corrode the predetermined breaking points. Several manufacturers therefore recommend using nothing but clean water to clean in this area.
Glass surfaces
To clean the surfaces, spray them with glass cleaner first, then wipe the glass pane with a damp microfibre cloth and polish it with a lint-free cloth.
A window vac can help you achieve streak-free results even faster: simply vacuum the cleaning solution off the glass pane.
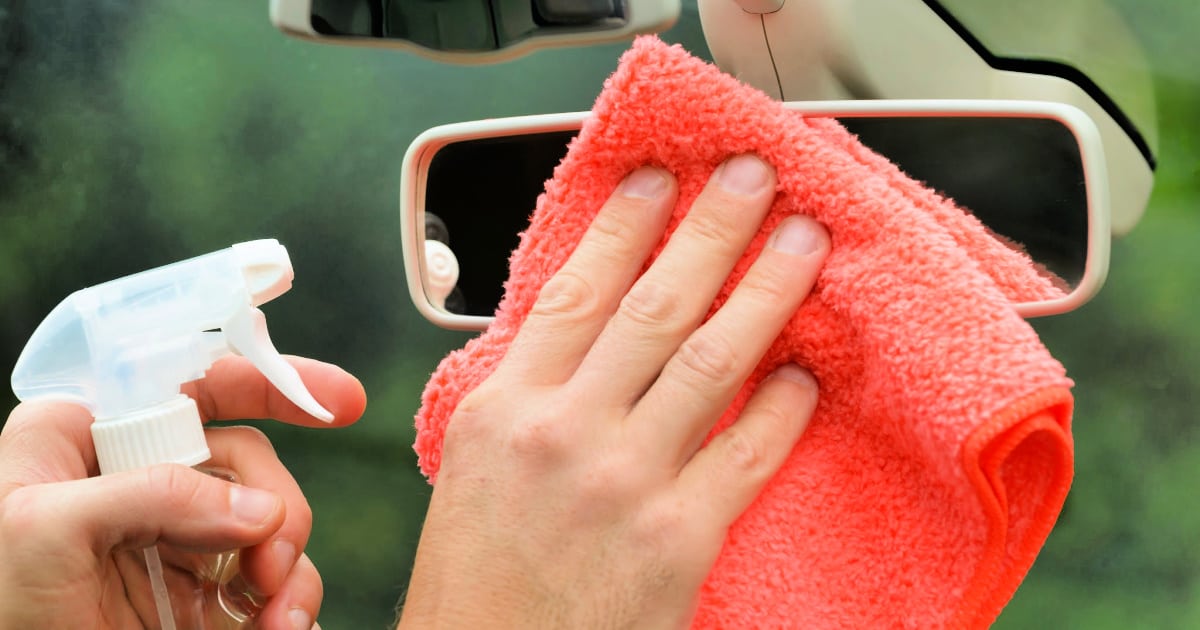
Before winter: Get your house and garden into shape
Summer is coming to an end, the warm days on the terrace are numbered and there is not much more to do in the garden. Now is the time to prepare the garden furniture and equipment for their winter break. We show you how to do it!
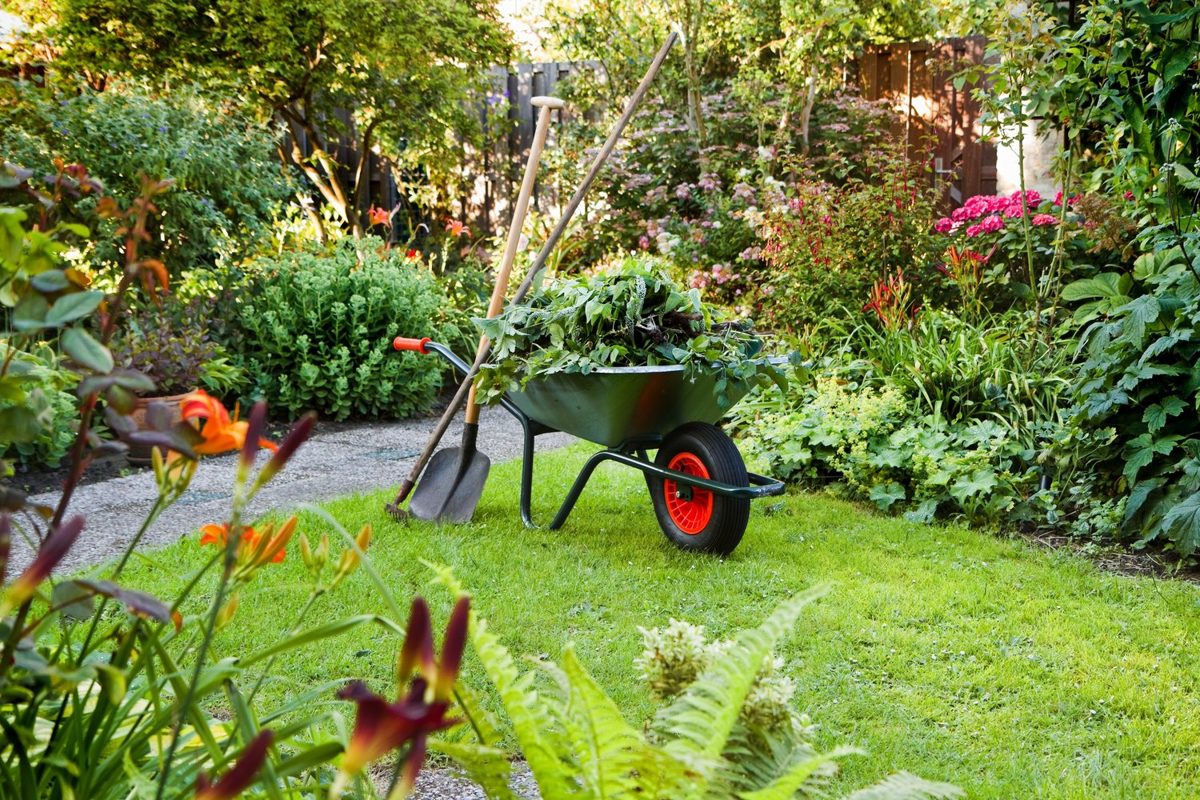
Check list: Prepared for autumn and winter
1) Garden furniture:
- Work to the surface with the flat pressure washer jet at a distance of 20 to 30 centimetres.
- If the dirt is very stubborn, the additional use of cleaning agents is recommended.
2) Flower pots and toys
- Flower pots, or the children's slide, can also be cleaned with the pressure washer along with the garden furniture, before they are all stored in the shed or cellar.
- The work with the strong water jet is particularly quick and easy on mostly robust plastic surfaces.
- This is also the case for ceramic plant pots.
3) Paths and walls
- Most natural impurities can generally be removed quickly with a pressure washer.
- Because moss and lichen clings very stubbornly to the pores of surfaces, use the rotating nozzle for cleaning.
- Get paths cleaned even faster with a so-called surface cleaner.
4) Terrace
- Clean terraces and balconies with flat jet nozzles and jet lances, which allow you to variably adapt the water pressure to the type of material.
- Using the pressure washer with a surface cleaner attachment makes the job particularly easy. Additional advantages are the spray protection, and the water saved by completing the work more quickly.
- Clean wooden surfaces with surface cleaners only, which allow the operating pressure to be regulated. Work with reduced pressure.
- If the wooden surface has not been cleaned for some time, it has been shown that first applying a detergent loosens the dirt. Use the pressure washer here too, to distribute the mix of water and detergent at low pressure.
Sweep up leaves without the back pain
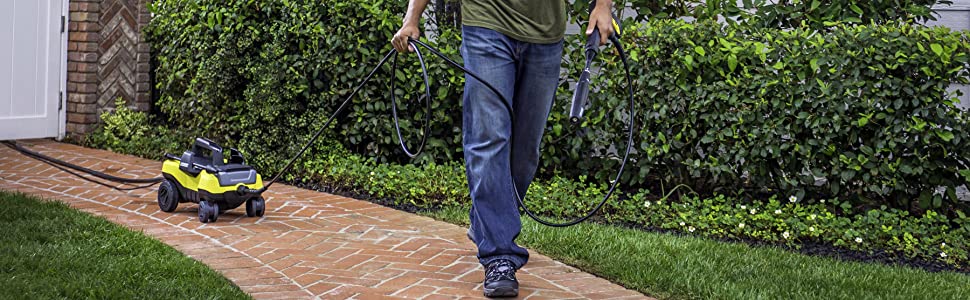
The most recommended sweepers are those equipped with two side brushes. Their long brushes expand the operating width, and ensure the edges of curbs and house walls are cleaned thoroughly.
Sweepers catch damp dirt as well as loose and dry dirt. There's no need to bend while sweeping, and you keep your hands clean. And because the sweepings go straight into the container, you don't have to start all over again after every gust of wind.
A storage tip A sweeper can take up quite a lot of space in the garage or shed. This problem is cleverly solved with machines that can be stored vertically against the wall with the push handles folded down.
Clean garden tools before storing them
Tools and equipment such as wheelbarrows, spades, grass and garden rakes should also be thoroughly cleaned in autumn. Because if earth and plant residue remains attached for a longer time, it absorbs moisture and can cause corrosion to the metal surfaces.
If a tool is cleaned before the winter break, its value is enhanced and its life is extended. The especially powerful dirt scratcher - a rotating point jet - can also be used to remove stubborn incrustations with the pressure washer.

How to store your pressure washer correctly
Once everything is clean, the pressure washer can take its well-earned winter rest. Remember:
Drain any remaining water from the device. The easiest way to do this is to briefly start the machine again – for around half a minute - after removing the high-pressure hose and switching off the water supply. If water remains in the device and freezes, the expansion force of the ice can damage the pump and seals.
Cart
Cart is empty.